VIEW BY CATEGORY:
Hi, we're Hunter and Sarah, a husband-and-wife, luxury wedding photography team. We’re also educators, helping other photographers build profitable and sustainable photography businesses.
MEET US
LOOKING FOR SOMETHING?
Post Production Secrets Step 5: How We Quickly Edit 1,000s of Wedding Photos in Adobe Lightroom
May 5, 2022
—
Hey photographers! Welcome back to our series all about culling and editing wedding photos: Post Production Secrets! We know that turning a few thousand raw files into a beautifully-edited, curated gallery of final images can feel like an incredibly daunting task. So this series is all about what happens after the wedding day!
If you build these efficient systems from the beginning, you’ll grow and scale your wedding photography business with much less pain. So let’s dive in!
Post Production Secrets Step 5: How We Quickly Edit 1,000s of Wedding Photos in Adobe Lightroom
If you speak to any wedding photographer, “editing” is almost a dirty word. After all, we got into photography because we love to be out with people, capturing beautiful moments, and creating art with our cameras! We don’t know anyone who got into professional photography because they love spending hour after hour retouching photos in Lightroom 😂 But one way or another, editing has to get done, so here’s how we make the process as smooth and efficient as possible.
Workflow, Workflow, Workflow
There’s no way around it: editing photos can take a long time. But that doesn’t mean there aren’t ways to make it go more quickly! The first wedding we ever shot was an 11-hour wedding day, but it took us more than 25 hours to cull and edit! That’s more than double the amount of time we actually spent shooting! However, fast-forward a few years, and just before we began outsourcing some of our post production, we could cull, edit, and deliver an 8-hour wedding day in fewer than 8 hours. How did we cut post production by almost 70%? By using efficient workflows, of course!
If you remember all the way back to Part 2, we talked about the importance of keywording your images. If you followed along with that, as well as the two-round cull in Step 3, you should now have a series of neat and tidy collections, each representing the very best photos from a certain part of the day (a collection of 84 unique 2-star wedding party portraits, for example). This will make your job SO much more manageable as you edit in smaller sections. Each time you finish a section of the day, your brain will give you a little boost of endorphins as you celebrate a series of minor victories!
Just like we do with culling, another psychological trick we use when editing is to start with the less creative/fun parts of the day, and work towards the more creative/fun parts (photographically speaking). This gives us something to look forward to as we edit! For us, this means we start with dancing photos, and work our way towards the portraits. The golden hour and first look portraits of our couples are always the last thing we edit – like a special treat to finish off the wedding editing! But just like with culling, this might be different for you. We do know that these little psychological hacks will make us less likely to get distracted and take a “break” that ends up wasting an hour browsing social media. If culling and editing takes you 8 hours, but you took 4 one-hour “distraction breaks” throughout, then it really took you 12 hours!
Using Develop Presets and Batch Editing in Adobe Lightroom
So exactly how do we edit photos? Using two essential features in Adobe Lightroom: develop presets and batch editing. And here’s how: we open up the wedding gallery to one section of the day (say, wedding party portraits, for example) and immediately open the metadata tab at the top of our Lightroom. Then, we make sure that we’re only looking at images from a single lens (the 35 mm f/1.8, for example).
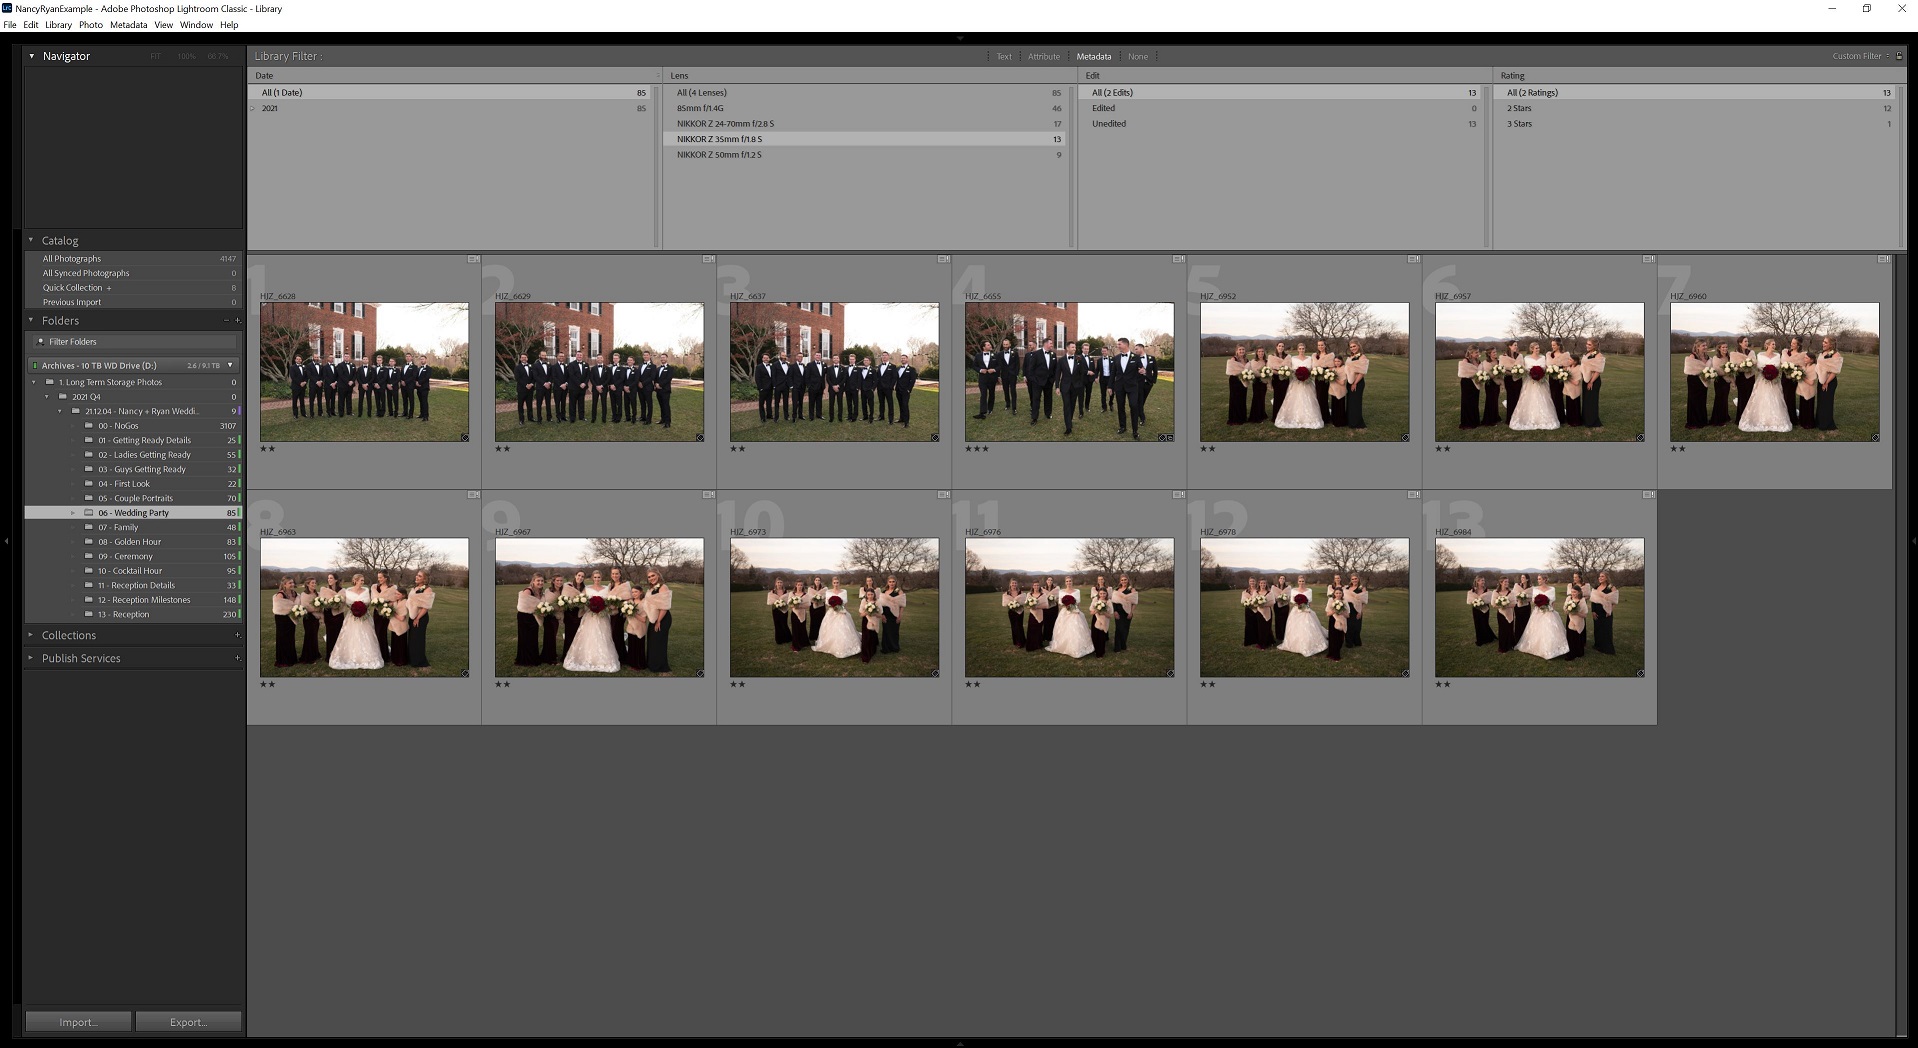
Then, we apply a preset that we created specifically for outdoor, natural light portraits in overcast light for the 35 mm lens! More on how we made that preset below.
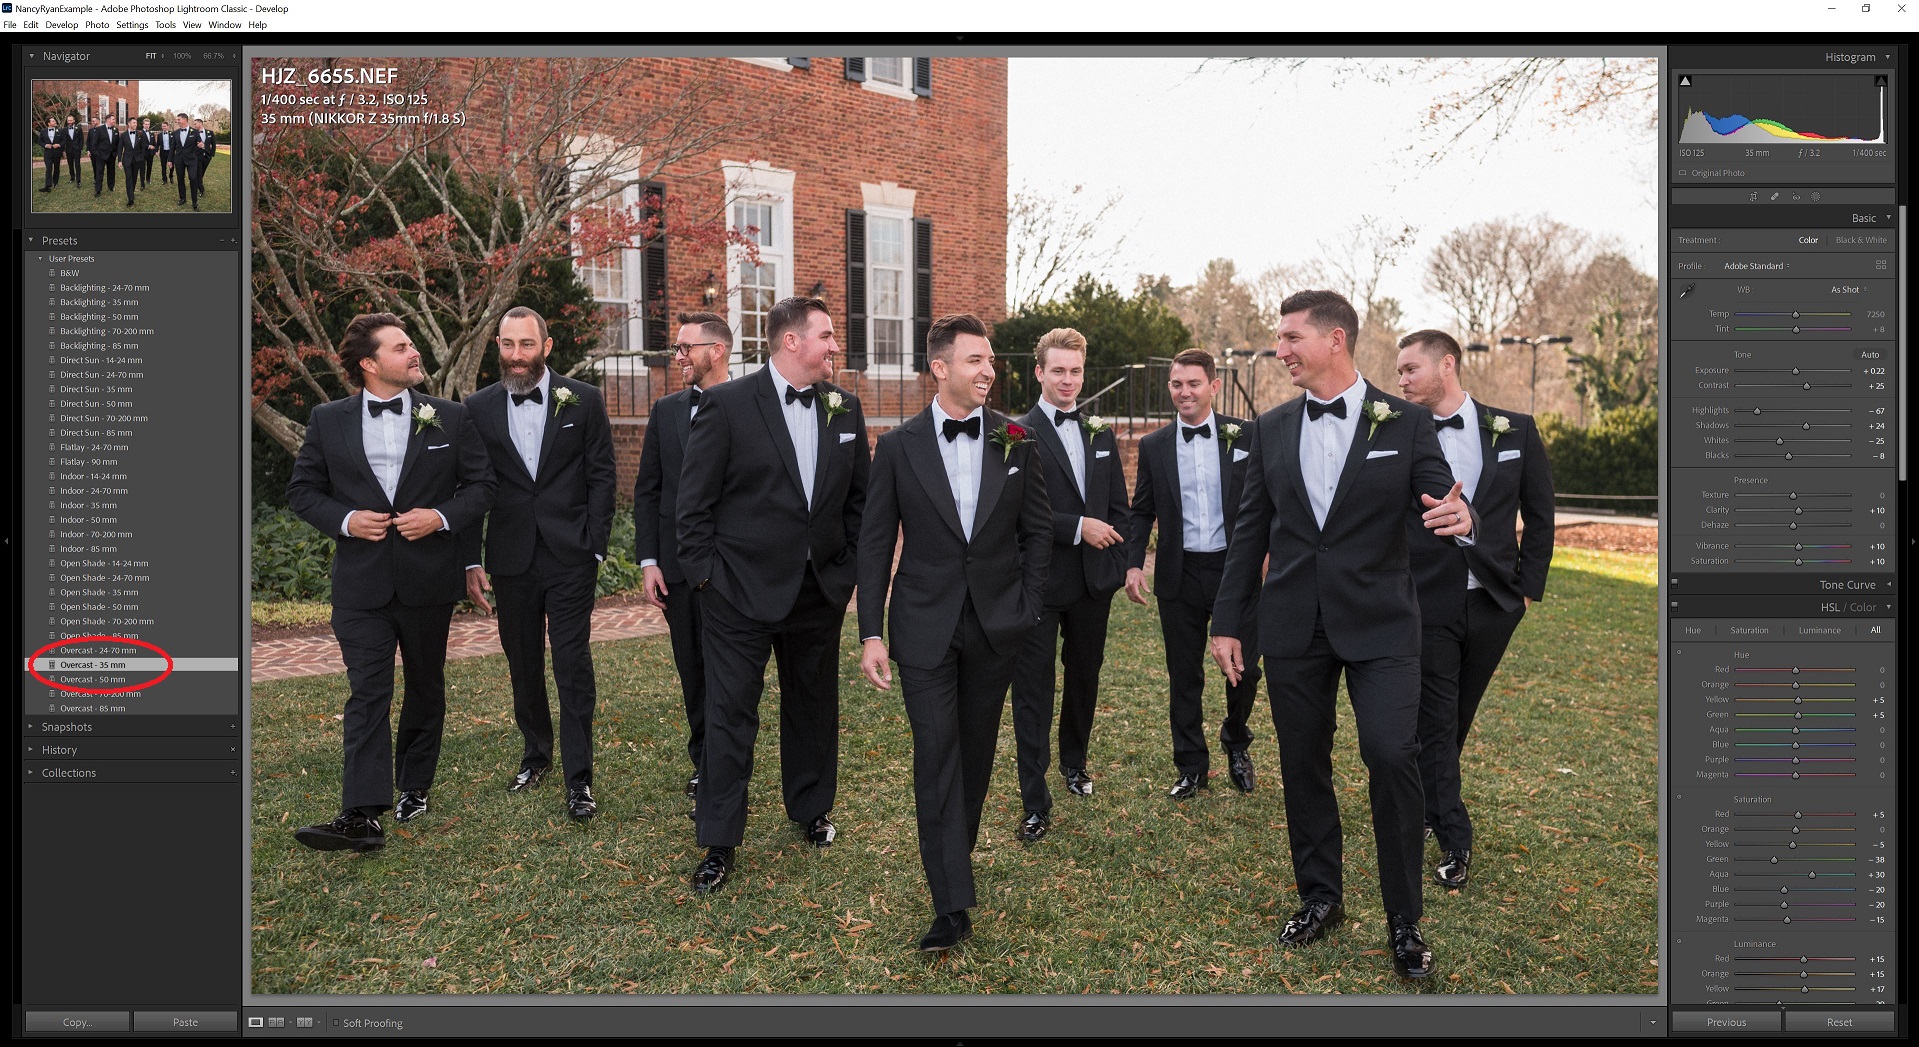
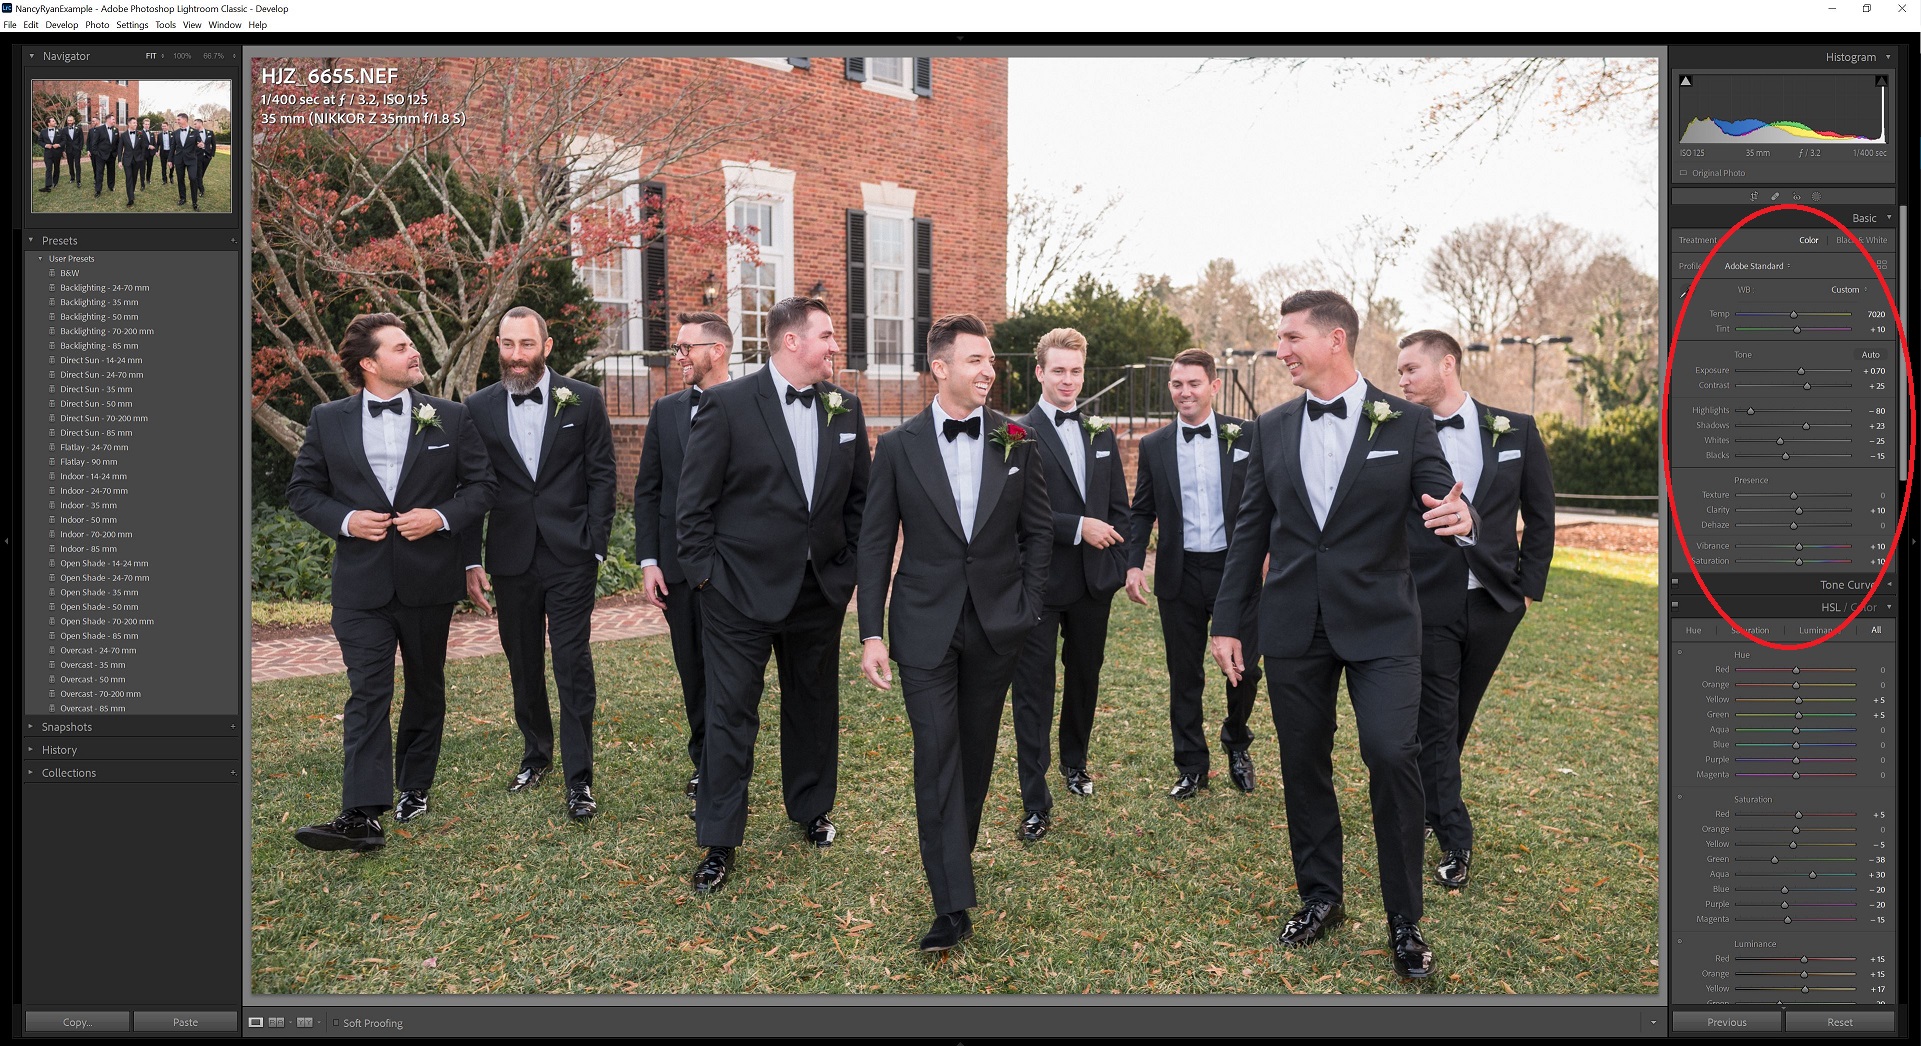
That preset won’t edit the image perfectly, but it’ll get us 90% of the way there! We’ll make a few quick adjustments to exposure and white balance if necessary, but most of the time, once we’ve applied the preset, we don’t need to make any adjustments outside the “Basic” panel.
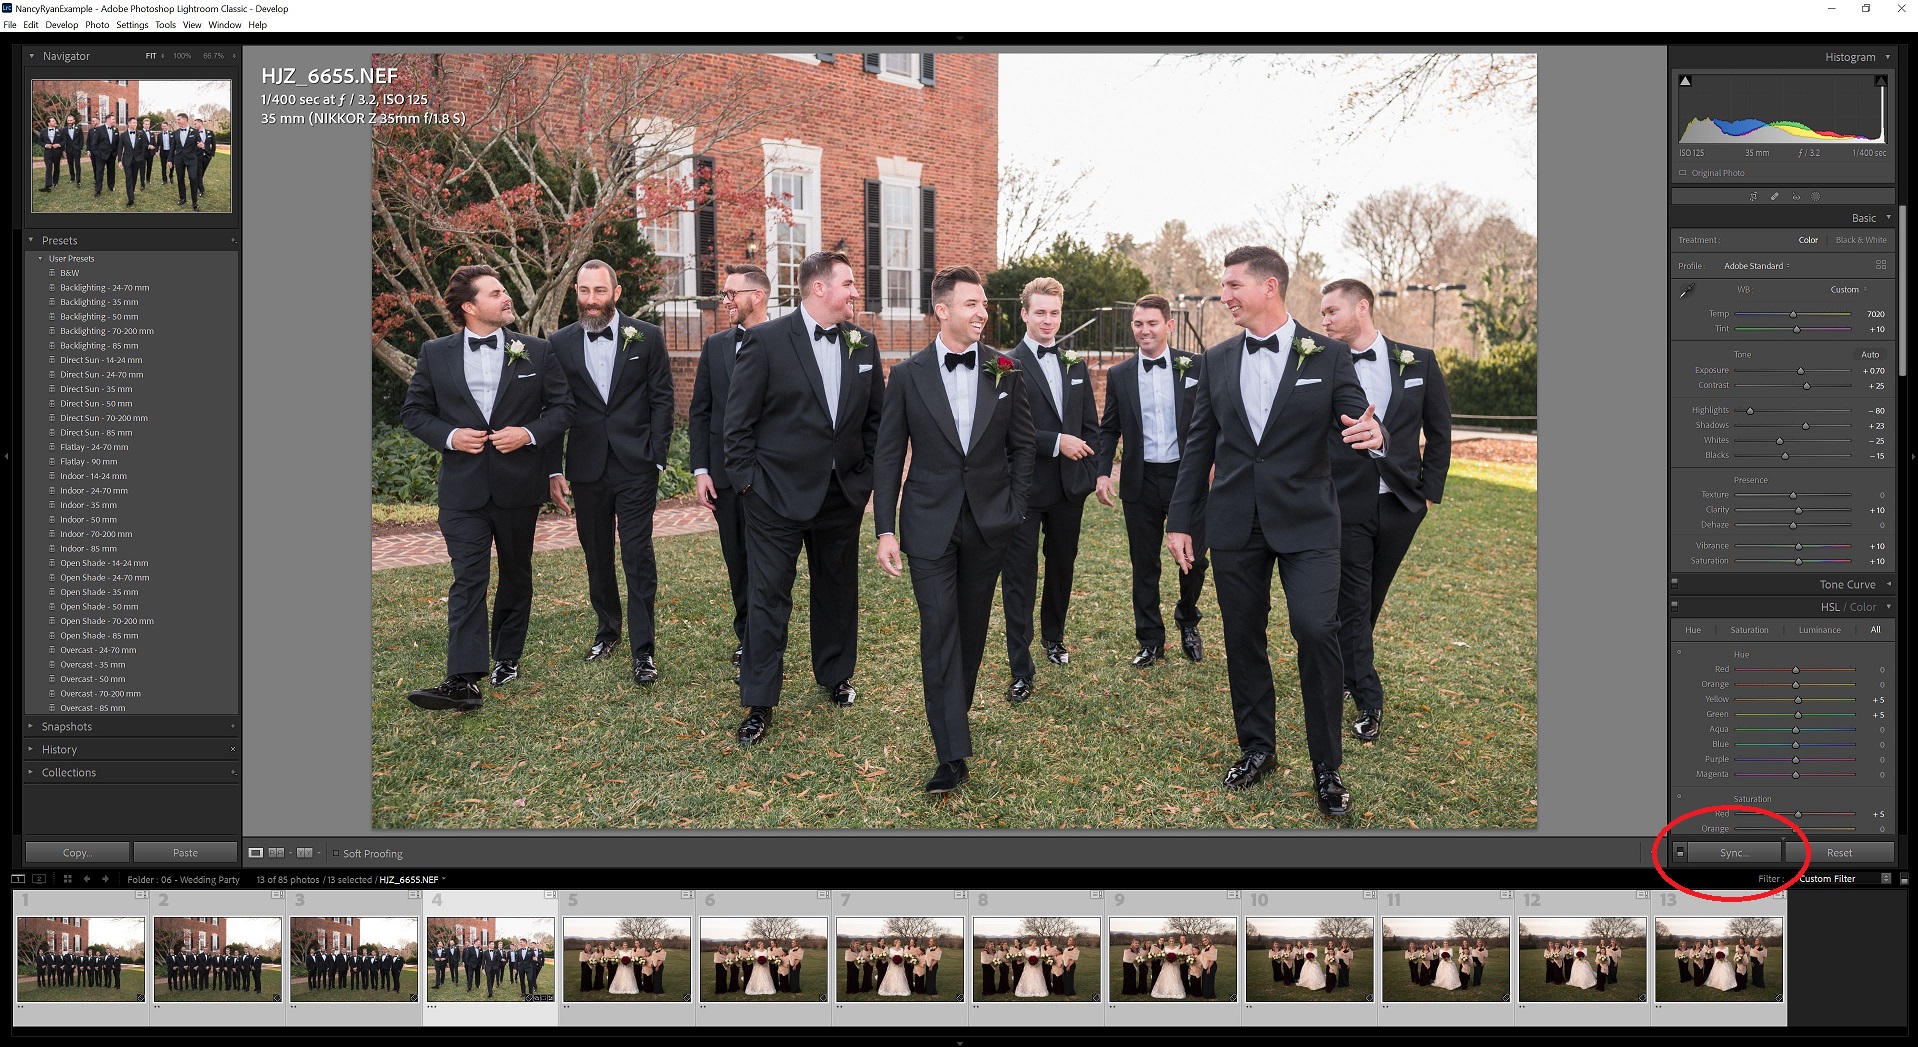
Now it’s time to batch edit. Using the “Filmstrip” at the bottom of our screen, we’ll use the shift and ctrl keys (cmd and ctrl keys on mac) to select all the images that look like they were captured in a similar lighting situation. Keep in mind: because of the metadata tab, we’re only looking at images captured with that same lens. Then, we use the “Sync” button to apply the settings from the first image to all the others.
Since those images were all taken with the same lens in the same lighting situation, they’ll also now be 90% edited! A quick touch-up on each photo for light and color will get them the rest of the way there!
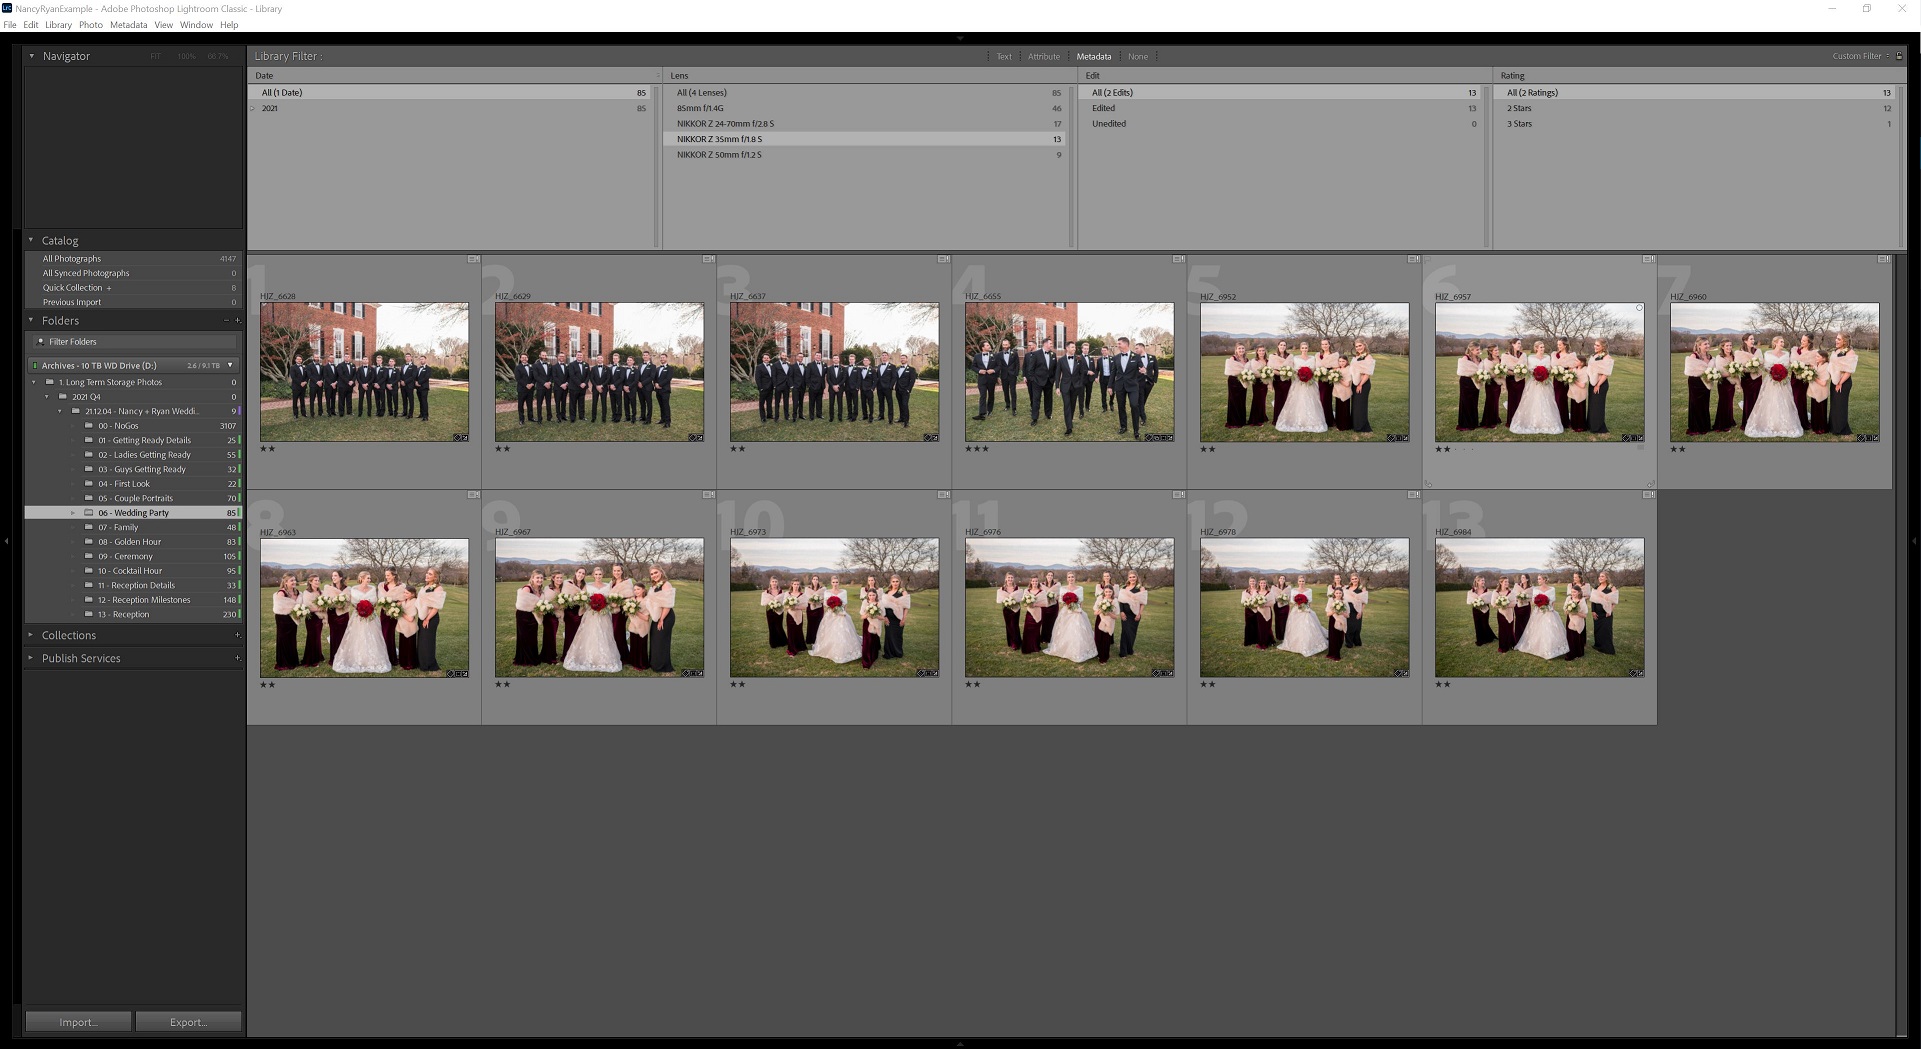
We’ll repeat that process with each lens we used during that portion of the day, using presets that correspond to each lens and lighting situation. Then, we’ll take one final look at that section of the gallery as a whole, with all lenses considered, to make sure that it looks like one cohesive work. Boom! Nancy and Ryan’s Wedding Party Portraits are done!
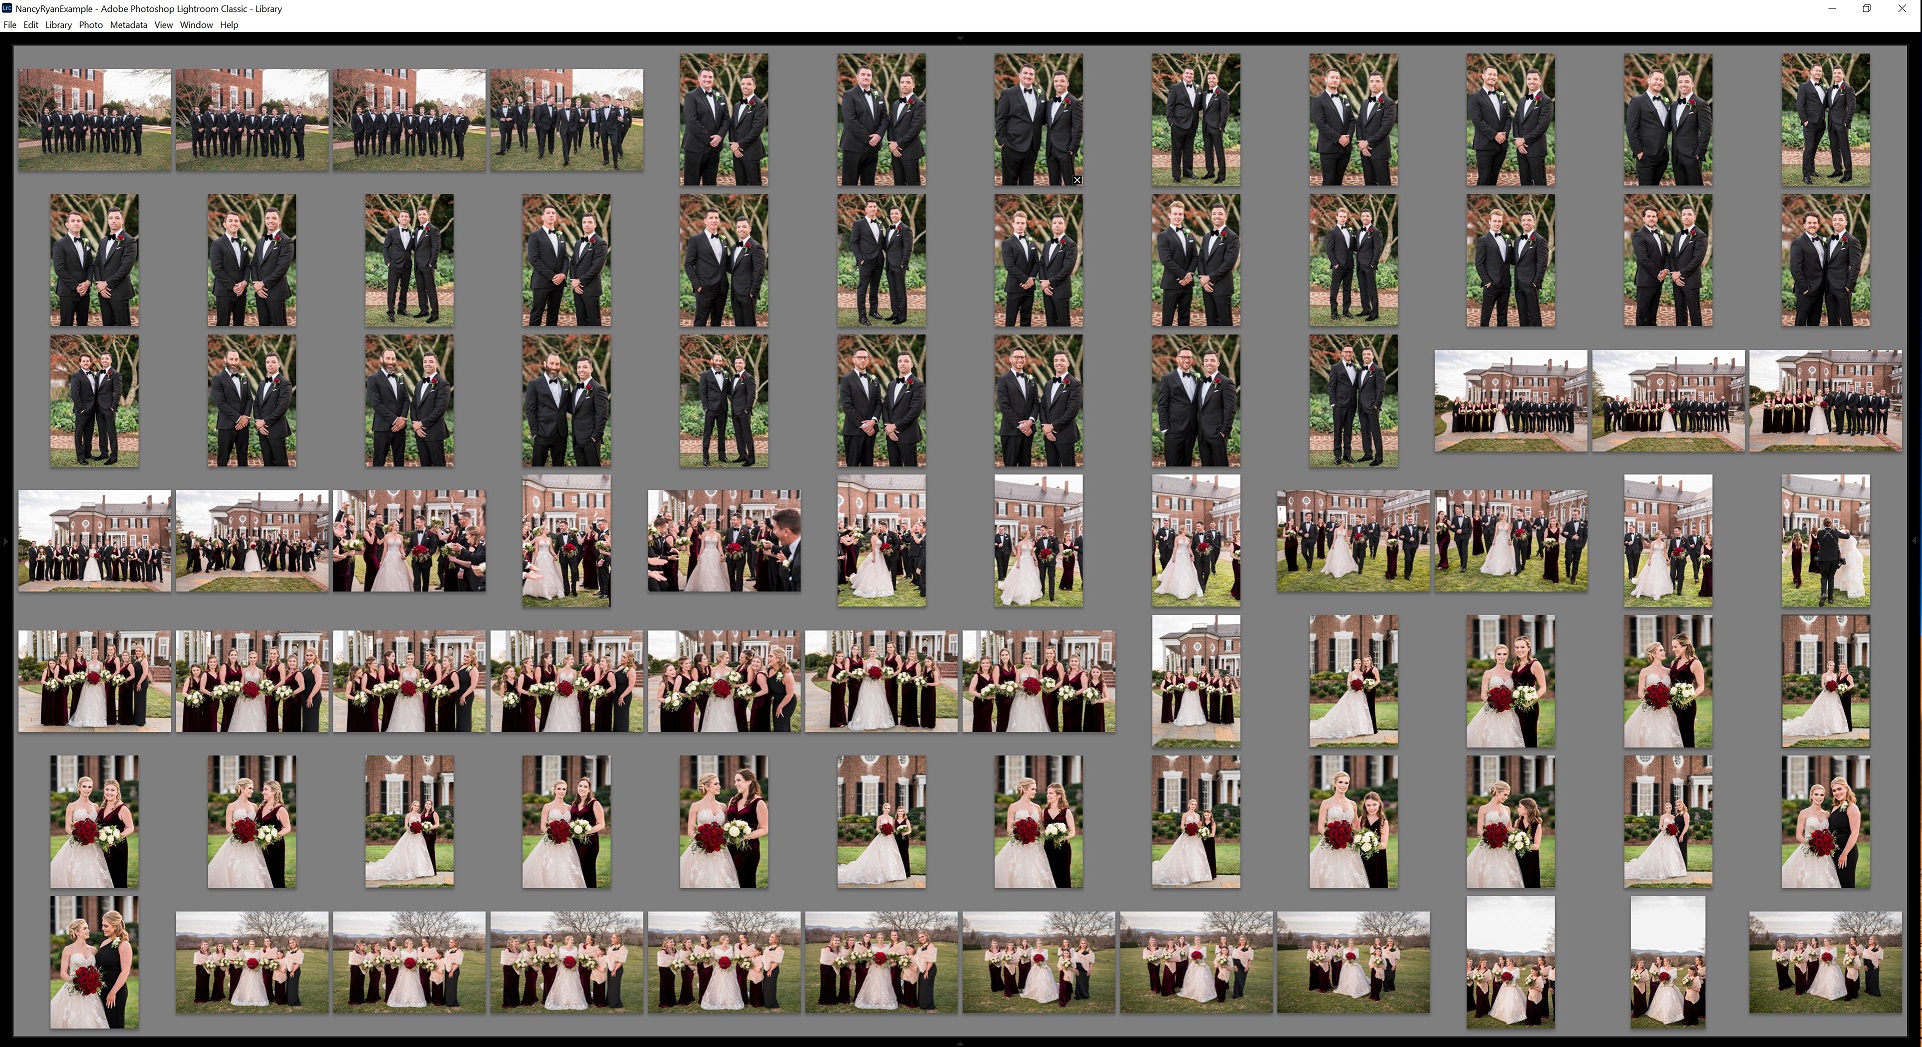
How to Make Your Own Lightroom Presets (Or Adapt Ones You Bought)
The process we’ve explained so far sounds pretty easy, but of course, it makes one big assumption: you have presets for every lens and lighting situation! But creating those develop presets isn’t as daunting as it sounds. It all starts with a single basic preset. We created ours from scratch about a year into our business, but it would be just as easy to purchase one and work off of that. If you’re still developing your own style, maybe you can use some of your previous edits as a baseline, and compare to an image style that you love from other photographers. Either way, this preset should get you very close to an image edit that you LOVE.
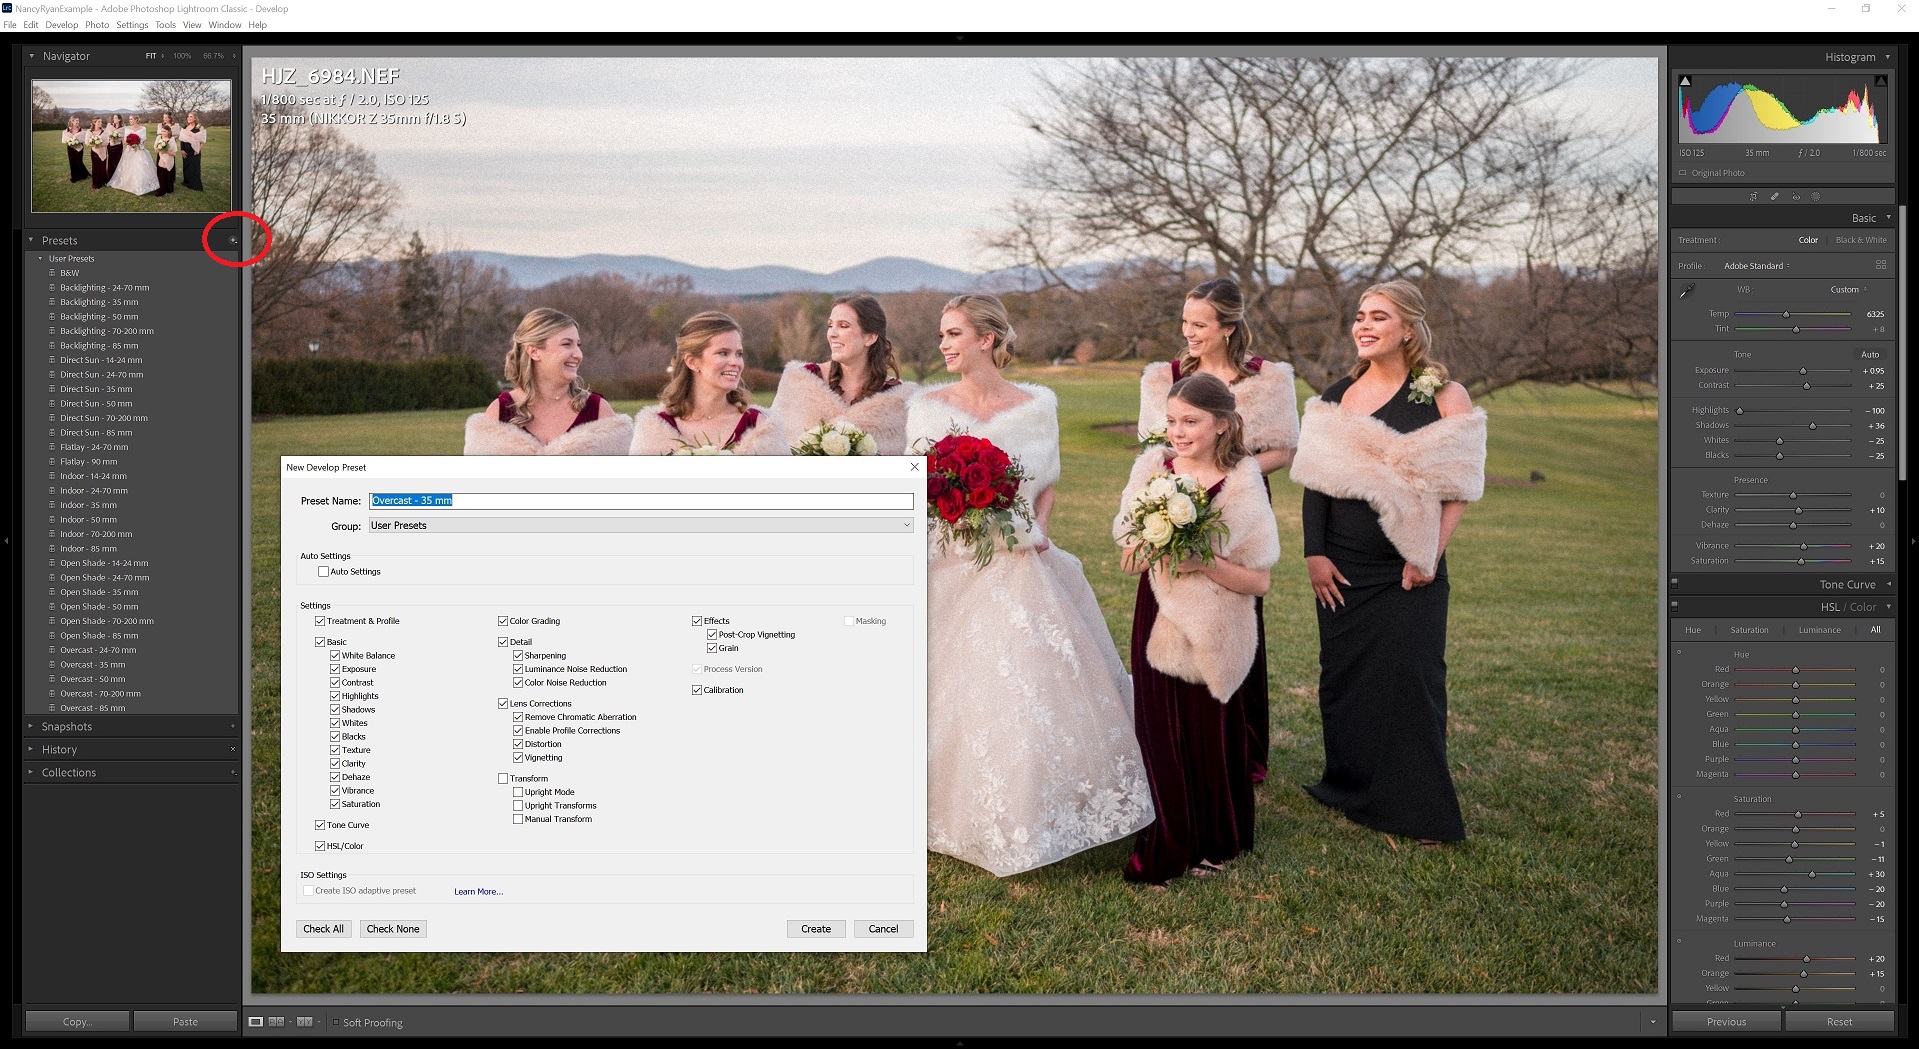
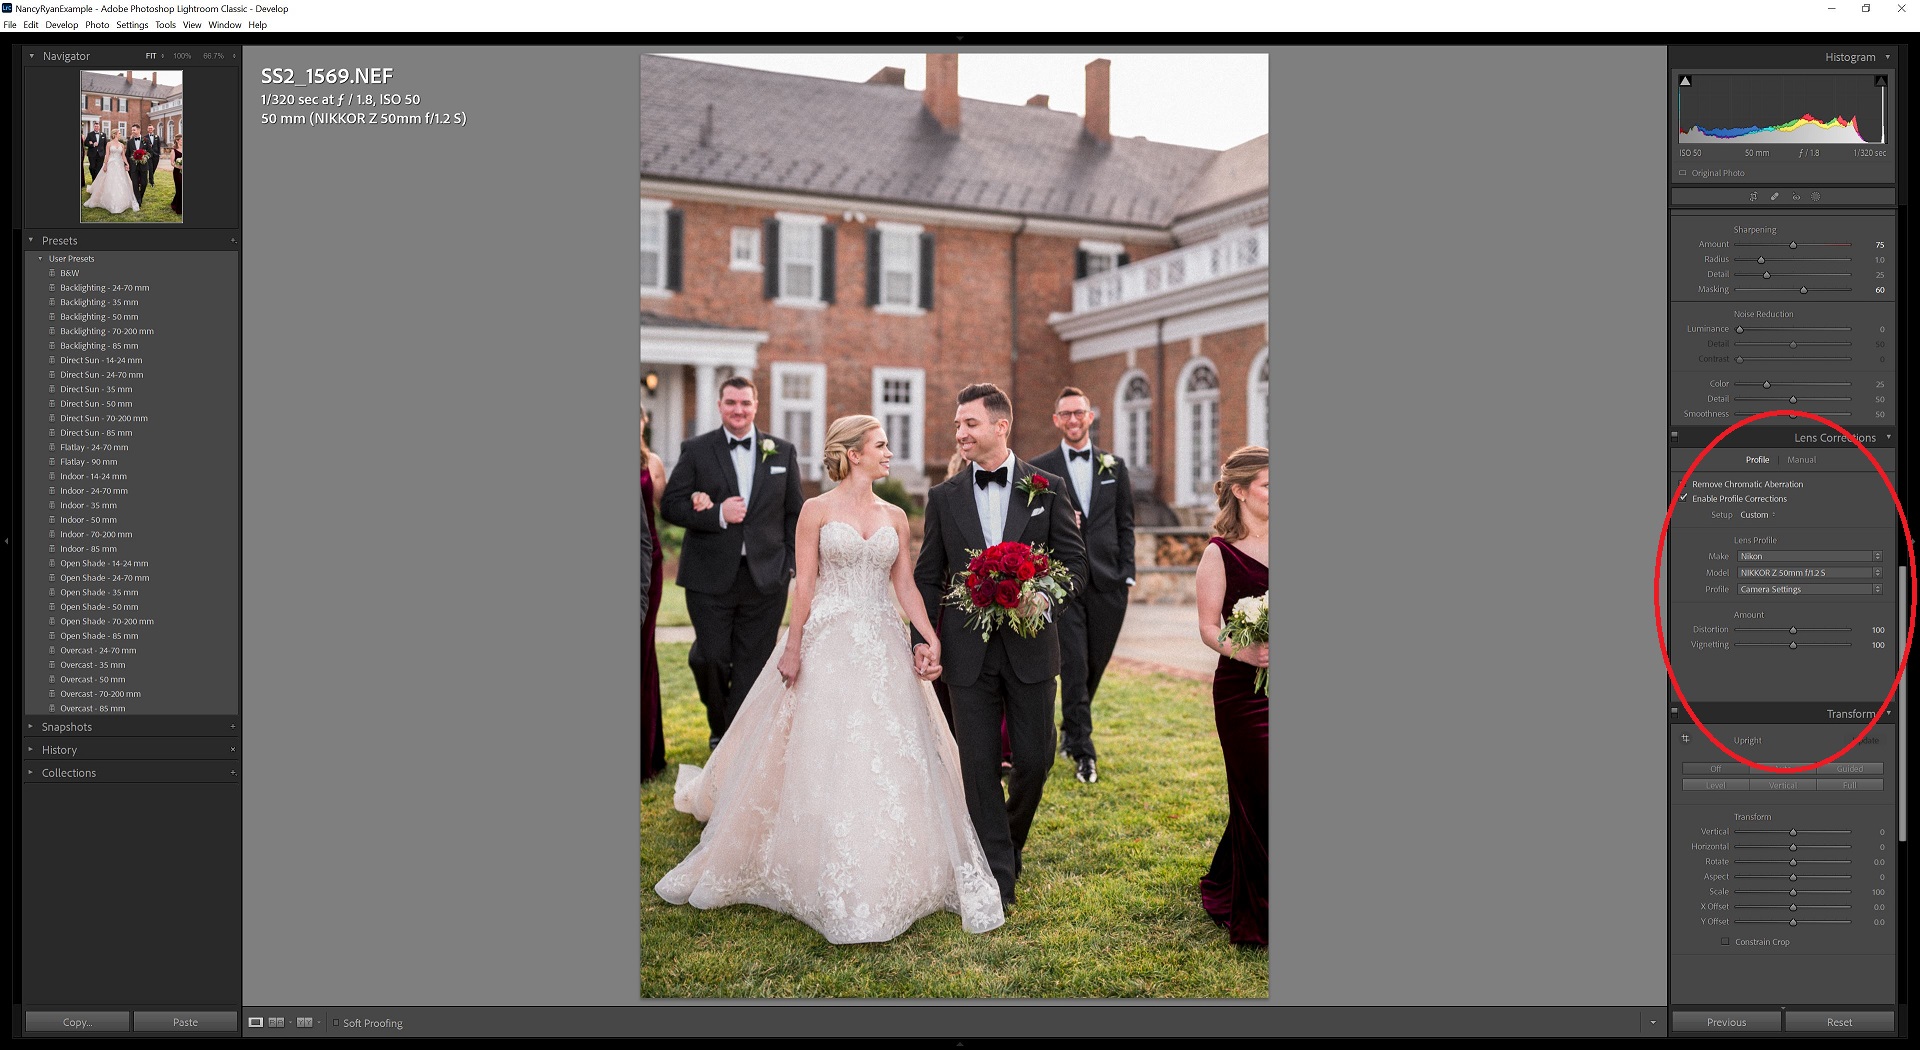
Alternatively, if you’re very new to photography and have no idea how to attain a certain style, then spending the money for a preset can be worth all the saved time. Either way, once you have that initial basic preset, we recommend making a few variations, like one version of the preset for each lens you regularly shoot with. In the Develop module, there’s a very handy check-box under the “Lens Correction” panel called “Enable Profile Corrections”. Lightroom has a massive catalog of popular lenses, and can automatically make adjustments to your images based on the lens that you used. While these adjustments will only correct for vignette and edge-distortion, they come a long way in helping images taken with multiple lenses look more cohesive!
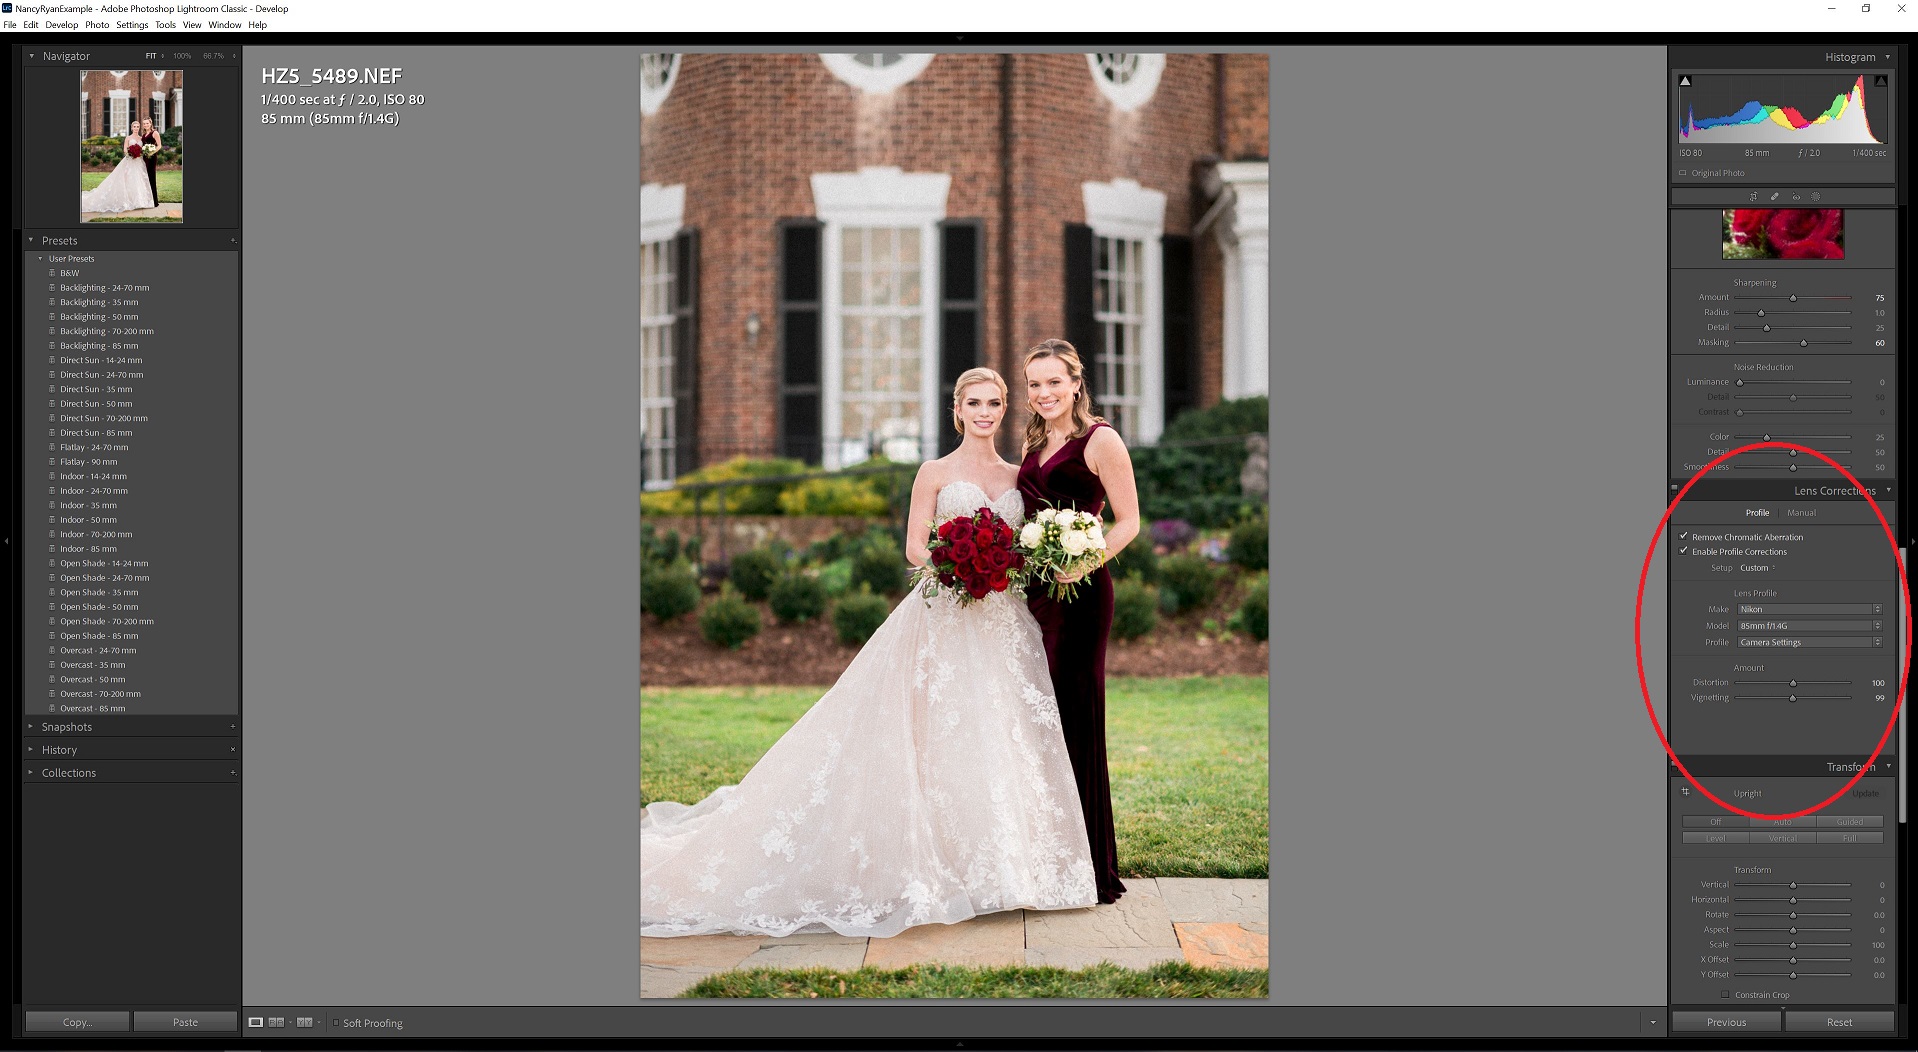
So we’ll take our basic preset, add the Lens Correction (for Nikkor 85 mm f/1.4G, for example) , and save it in our Presets tab as “Overcast – 85 mm”. Then, we’ll find an image taken in the same light but with the Nikkor 50 mm f/1.4G and apply that same preset. We’ll change the Lens Correction to the right lens, and make any adjustments in “HSL/Color” Panel that are necessary (different lenses can interpret the same light and colors in different ways). Then we’ll save that preset as a new one called, “Overcast – 50 mm”.
Sometimes the changes between lenses are small. But our preset for an 85 mm prime lens and a 14-24 mm wide-angle zoom will look very different! And this is especially true if you have different lenses by different camera manufacturers, like if you have a Nikon prime, a Tamron zoom, and a Sigma macro.
Why we Have a LOT of Presets
If you’re having trouble getting a consistent editing look across different lenses, try this: Go outside during the time when you’d typically be shooting (like golden hour or mid-afternoon in open shade), with a friend to stand in as your subject. Ask them to stand still, and as quickly as you can, take a photo of the same subject, from the same position, with the same light, with each lens you own. This will make it even easier to create presets that will get you a consistent look across different lenses! Then, repeat in other lighting situations. When you’re looking at the same subject in the same light, it’ll be more obvious what changes in exposure, saturation, hue, vignette, etc. need to be made for each lens’ preset to achieve a consistent look.
Once you have a preset for each lens, we recommend having a second version for indoor photography. Your nighttime preset will need to adjust for the different exposure, contrast, and HSL color profiles. Then repeat for overcast vs. sunny, and for backlighting vs. direct sunlight, etc. Experiment with these presets until you get the look that you desire across a wide range of lighting condition and lenses! If you only shoot with a single lens right now, you may just need a small handful of presets. On the other hand, Sarah and I have seven lenses that we use in varying amounts on wedding days, and each lens has a version for when we shoot in backlighting, direct sun, indoor, open shade, and overcast. So we have more than 30 presets! We even have a few extra presets for specific situations, like flat-lay details, ring shots, or when we make images black-and-white.
Yes, it takes a lot of time to make these profiles, and you’ll likely need to make adjustments over time as your style changes and your shooting develops. But trust us – you’ll thank us later! Once you have these presets made, your editing process will become SO much more quick and efficient! No more editing photos from scratch, and batch editing will make the process as painless as possible. That way, you can spend less time editing photos on your computer, and more time loving and serving your clients!
We know that these tips and tricks will be game-changers for you like they were for us. Next week, we’ll tie up all the loose ends on this series with exporting and gallery delivery, but for now, happy editing!
Want More?
Click HERE to get your free copy of our eBook: “5 Essential Tips for Turning your Side-Hustle into a Full-Time Photography Business.” You’ll also be subscribed to our newsletter, so our newest content, weekly encouragement, and exclusive offers will be delivered right to your inbox!
—
Check out the other segments in this blog series!
-
- Post Production Secrets Step 1: Best Backup System for Wedding and Portrait Photographers
- Post Production Secrets Step 2: How Keyword Sorting in Lightroom Will Change Your Life
- Post Production Secrets Part 3: Have You Been Culling/Selecting Wedding Images WRONG this Whole Time?!
- Post Production Secrets Step 4: Maximize Your Client Experience with Sneak Peeks And Blogging
- Post Production Secrets Step 5: How We Quickly Edit 1,000s of Wedding Photos in Adobe Lightroom
- Post Production Secrets Step 6: Best Photo Delivery Service for Wedding Photographers
Filed in:
Wedding Photography & Photography Education
Charlottesville, Virginia and Beyond
HOME
ABOUT US
WEDDINGS
JOURNAL
FOR PHOTOGRAPHERS
PRESS & PRAISE
BLOG
CONTACT
e. hunter@hunterandsarahphotography.com
p. (434) 260-0902
