VIEW BY CATEGORY:
Hi, we're Hunter and Sarah, a husband-and-wife, luxury wedding photography team. We’re also educators, helping other photographers build profitable and sustainable photography businesses.
MEET US
LOOKING FOR SOMETHING?
Post Production Secrets Step 6: Best Photo Delivery Service for Wedding Photographers
May 12, 2022
—
Welcome back to our Post Production Secrets series, all about the steps that every photographer takes AFTER a wedding day or a portrait session is done!
Post Production Secrets Step 6: Best Photo Delivery Service for Wedding Photographers
If you’ve been following along with this entire series from the beginning, you may be wondering. “What’s next?” We’ve backed up our images, keyworded them, culled, blogged, and edited each photo in the gallery. What could possibly be left?! Well, there’s a few final steps in our wedding photography workflow that not only helps us stay organized, but helps us to give our clients the best possible experience!
How to Export Photos in Adobe Lightroom
We ended Part 5 with the images fully-edited in your Adobe Lightroom catalog. But it doesn’t do your clients any good to have fully-retouched raw files sitting on your computer! So the next step is to export your photos into a format that your clients can easily access. We recommend exporting in full-sized jpeg format, as it’s the best compromise of file size and quality.
And here’s a little pro tip: we use a Lightroom plugin called JPEG Mini Pro, which is a total game-changer! They use a proprietary “image compression” software that connects directly with Lightroom or Photoshop. It allows you to export photos that are up to 50% smaller without sacrificing the quality at all! It sounds a bit like magic to me, but we try not to ask too many questions 😂 As if one-time fee of less than $100 wasn’t already a huge steal, you can use code “HSP20” to get another 20% off, courtesy of Hunter and Sarah Photography and the JPEG Mini Pro team!
This will save you storage on your own computer (which is clutch), on your clients’ computers (which is more clutch), and on whatever gallery service you use to host (which is the most clutch of all). Because most gallery services will charge you based on the amount of storage you take up, this means you can deliver almost twice as many photos to clients before having to upgrade your storage with whoever you use for gallery delivery!
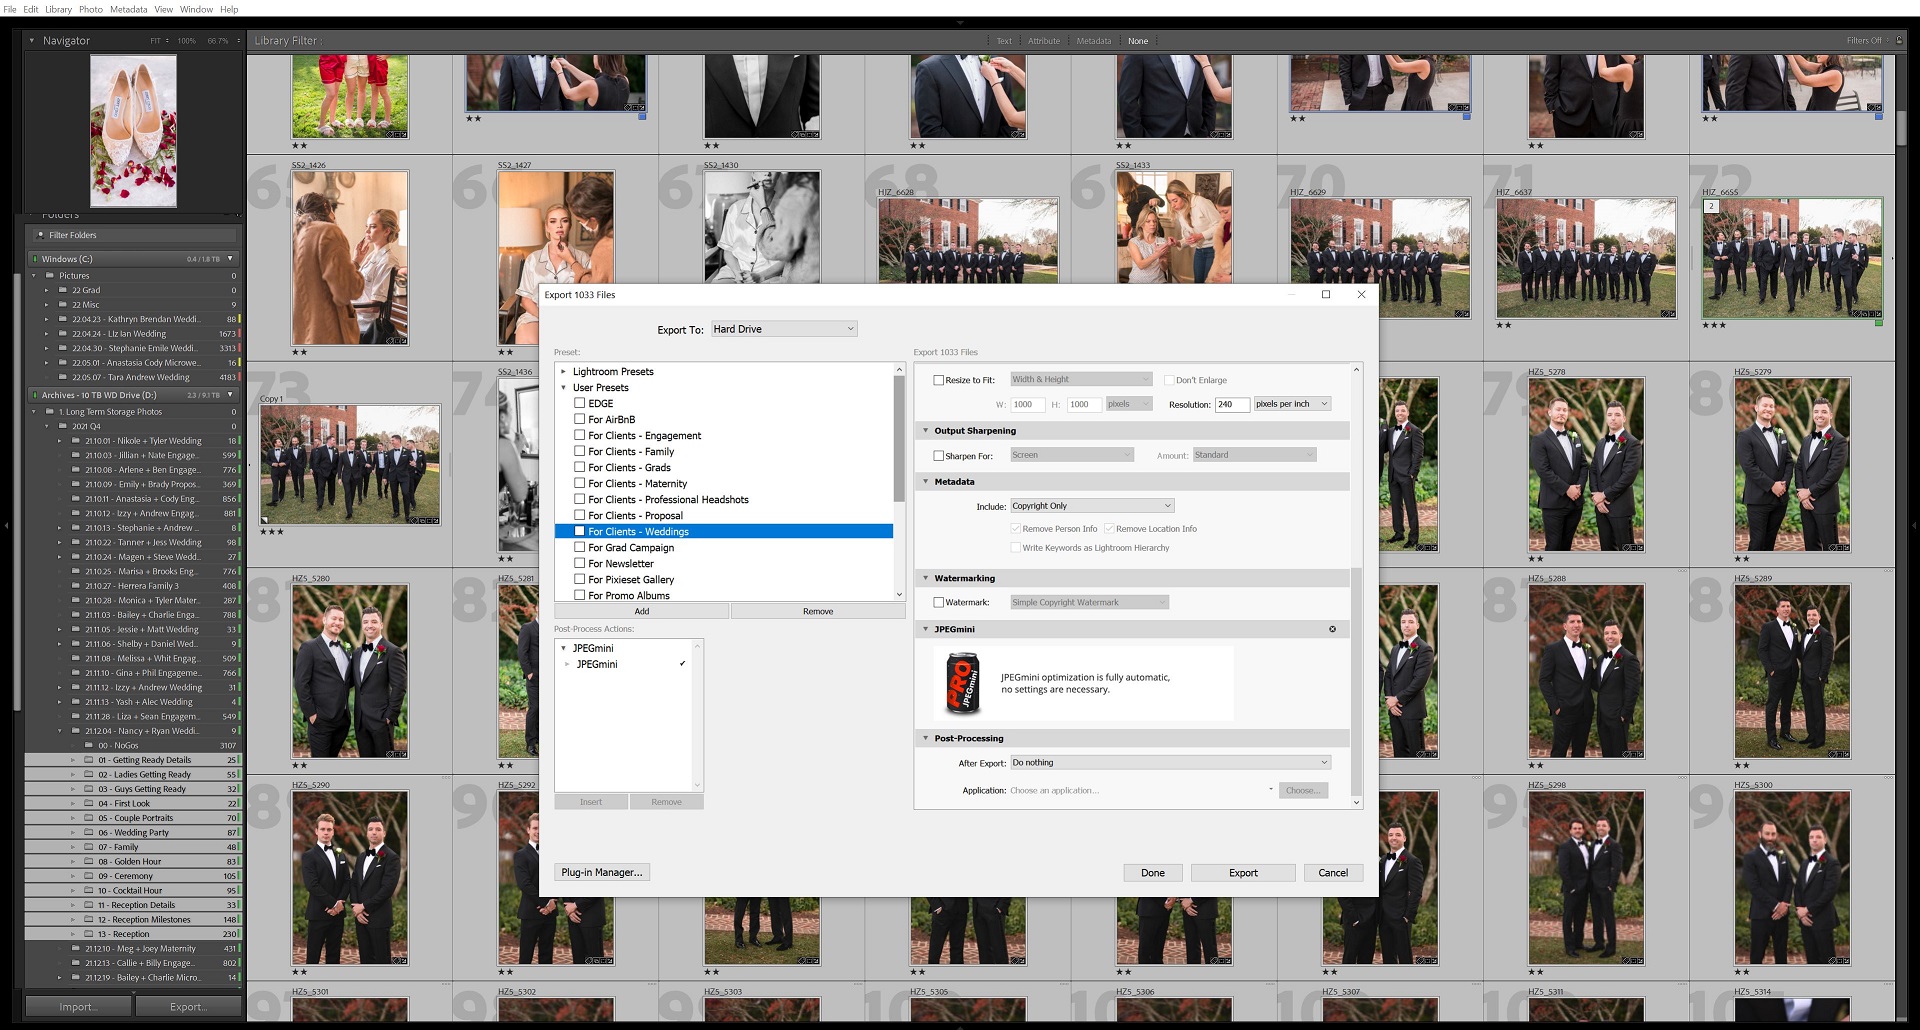
Once you purchase and install JPEGMini Pro on your computer, you don’t ever have to touch it again. It runs itself every time you export a photo from Lightroom, cutting your file sizes as small as 50%!
Best Online Photo Gallery Service for Wedding Photographers: Pixieset
Now that you’ve got a few hundred (or thousand) JPEG files on your computer, what’s the best way to get them to your client? The days of burning CDs or dumping files on USB flash drives are over. In the world of instantaneous results, an online delivery system is what most clients are expecting. We want to treat our clients like we wanted to be treated when we were shopping for wedding photographers, and we know we certainly wanted an online gallery!
Although there are many gallery services out there, Hunter and I use (and LOVE) Pixieset. After doing a lot of research, this made the most sense for our business. Their galleries are beautiful for our clients, and easy to use for us and them. We can sell prints directly through our online galleries with just a few clicks of a button, and Pixieset does 100% of the work and just sends us our profit every time we make a sale! If you want to sign up for Pixieset, you can click here! You’ll get an extra 250 MB of storage for using that link, even if you just sign up for their “endless free trial” with up to 3 GB of storage!
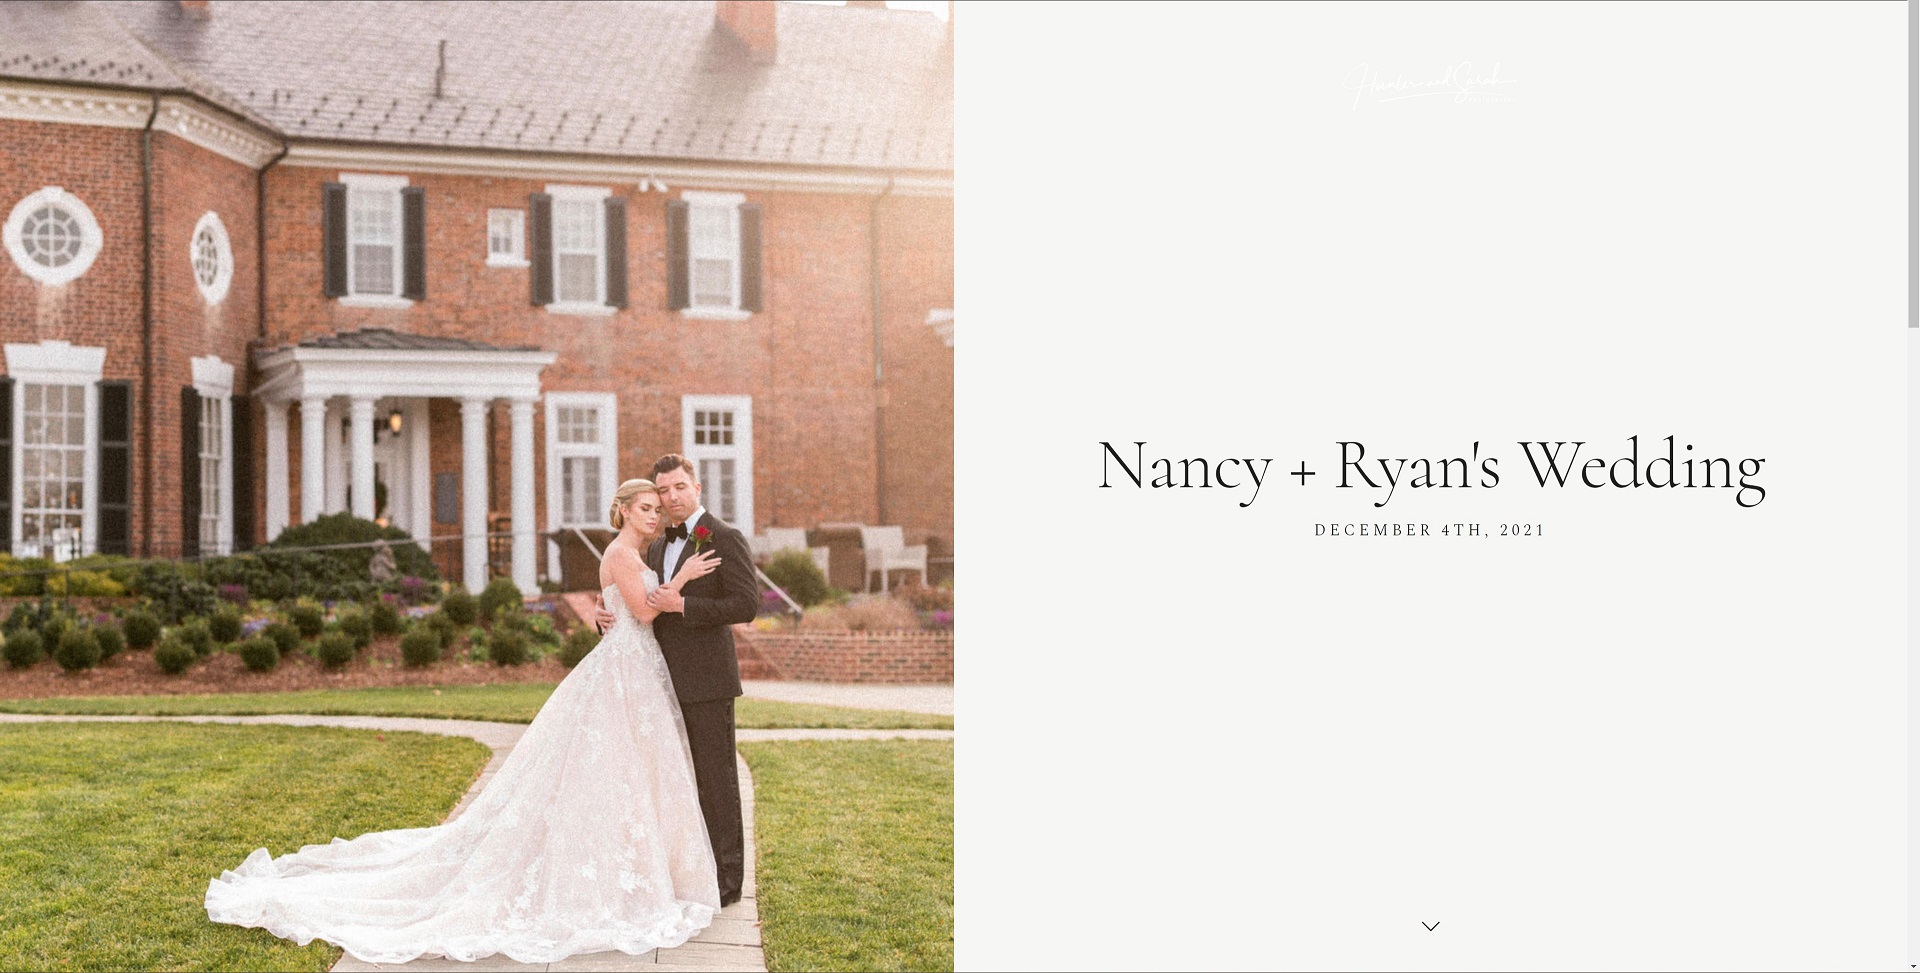
This is a MUCH better first impression than opening an email that just shows a Dropbox logo and says “Hunter Sheldon shared folder nancy_ryan_wedding_120521 with you.” 😂
This is one of our favorite parts of Pixieset. Whether you’re using them for gallery delivery, or even building your first beginner website with them, we’ve always been impressed with their great interface and their reasonable pricing. Although we built our first website before Pixieset offered sites, many of our apprentices and students use them for their website, and we’re very impressed with what you can get with their free plan, or just $10-$20/mo.
Another great part about our workflow is that the wedding is already broken up into categories (remember Part 2?). So when you upload it to the gallery, your clients can easily relive their day in the same chunks that you captured it in! You should keep this in mind when you create the categories in the first place. Yes, they’re mostly for internal use, but your client-facing gallery can feature these same categories as well!
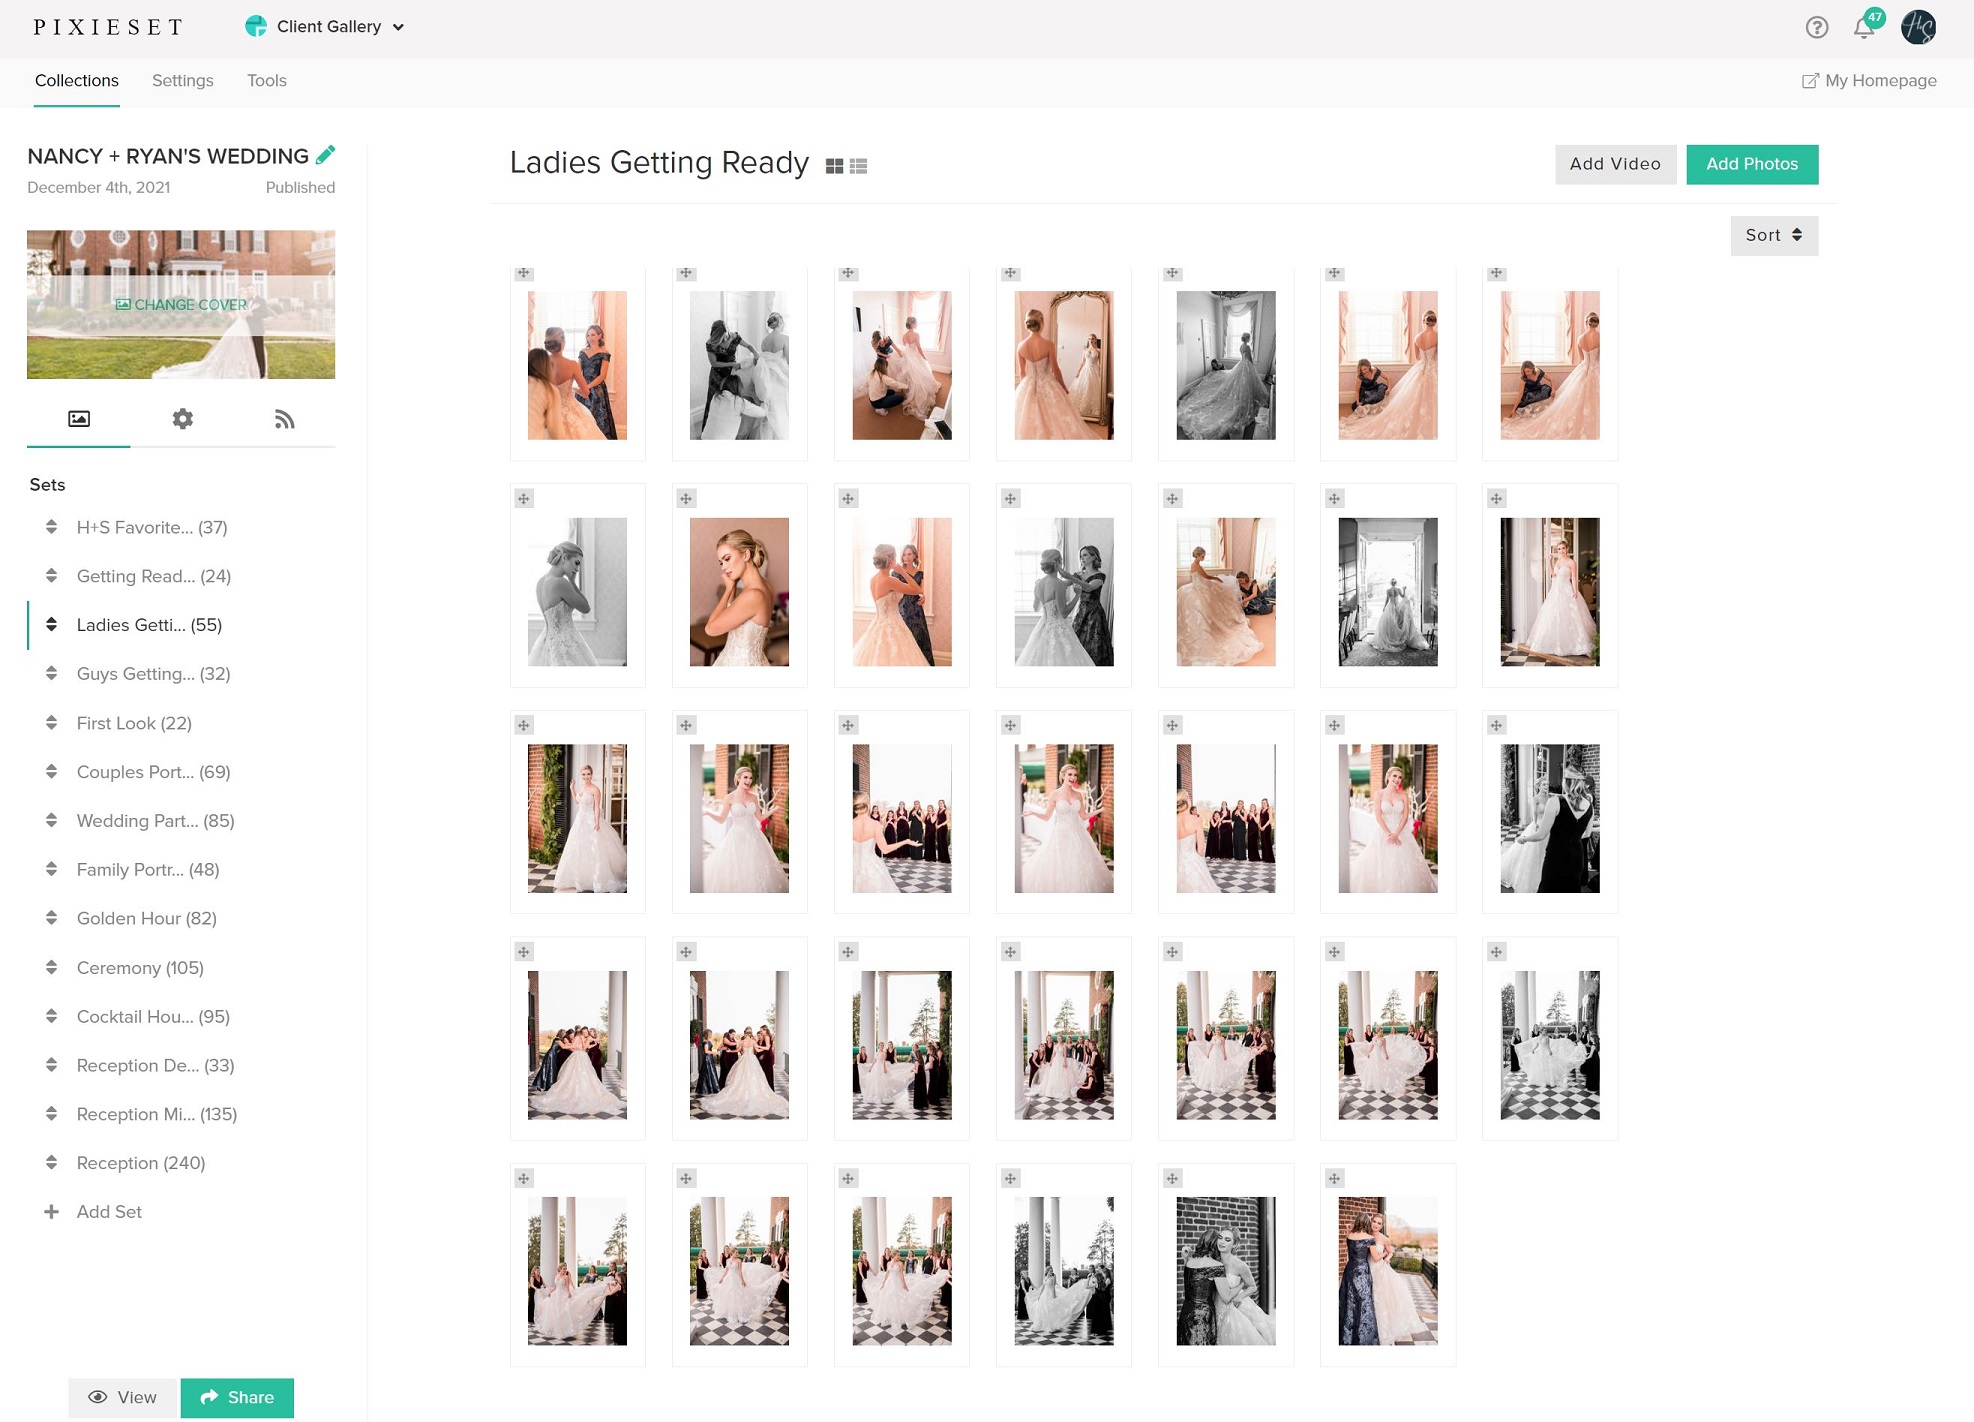
This is what the “back-end” of Pixieset looks like. Your clients will never see this side, but you can easily create, customize, and mix-and-match whatever categories you’d like!
Make Gallery Delivery Memorable! 🎉
So after ALL of this work you’ve done, this is the moment where your couple will finally get their wedding gallery (or where your clients will get their family photos, or engagement session). They don’t know about all the hours that went into culling and editing their photos; this final product is only their second (or maybe third) interaction with their photos after their sneak peek and/or blog!
This is a huge moment, and their first impression will certainly influence how they feel about their weddings photos. That’s why using a beautiful gallery service like Pixieset – as opposed to just sending them a Google Drive or Dropbox link – can make a big difference. Opening a standard, vanilla file-sharing link and viewing a list of file-names feels corporate, cold and disconnected. They might open galleries like that at work, which makes this feel way less fun! Opening their wedding gallery should feel like attending a party in their honor!
Putting your best images forward can also help them get excited for the gallery right when they open it! Since you already selected some of your favorites for the blog, this is an easy extra step. Sarah and I have a “favorites” gallery that our couples will see as soon as they open their gallery. These are their blog images again, but it puts our best foot forward for their first impression of their images.
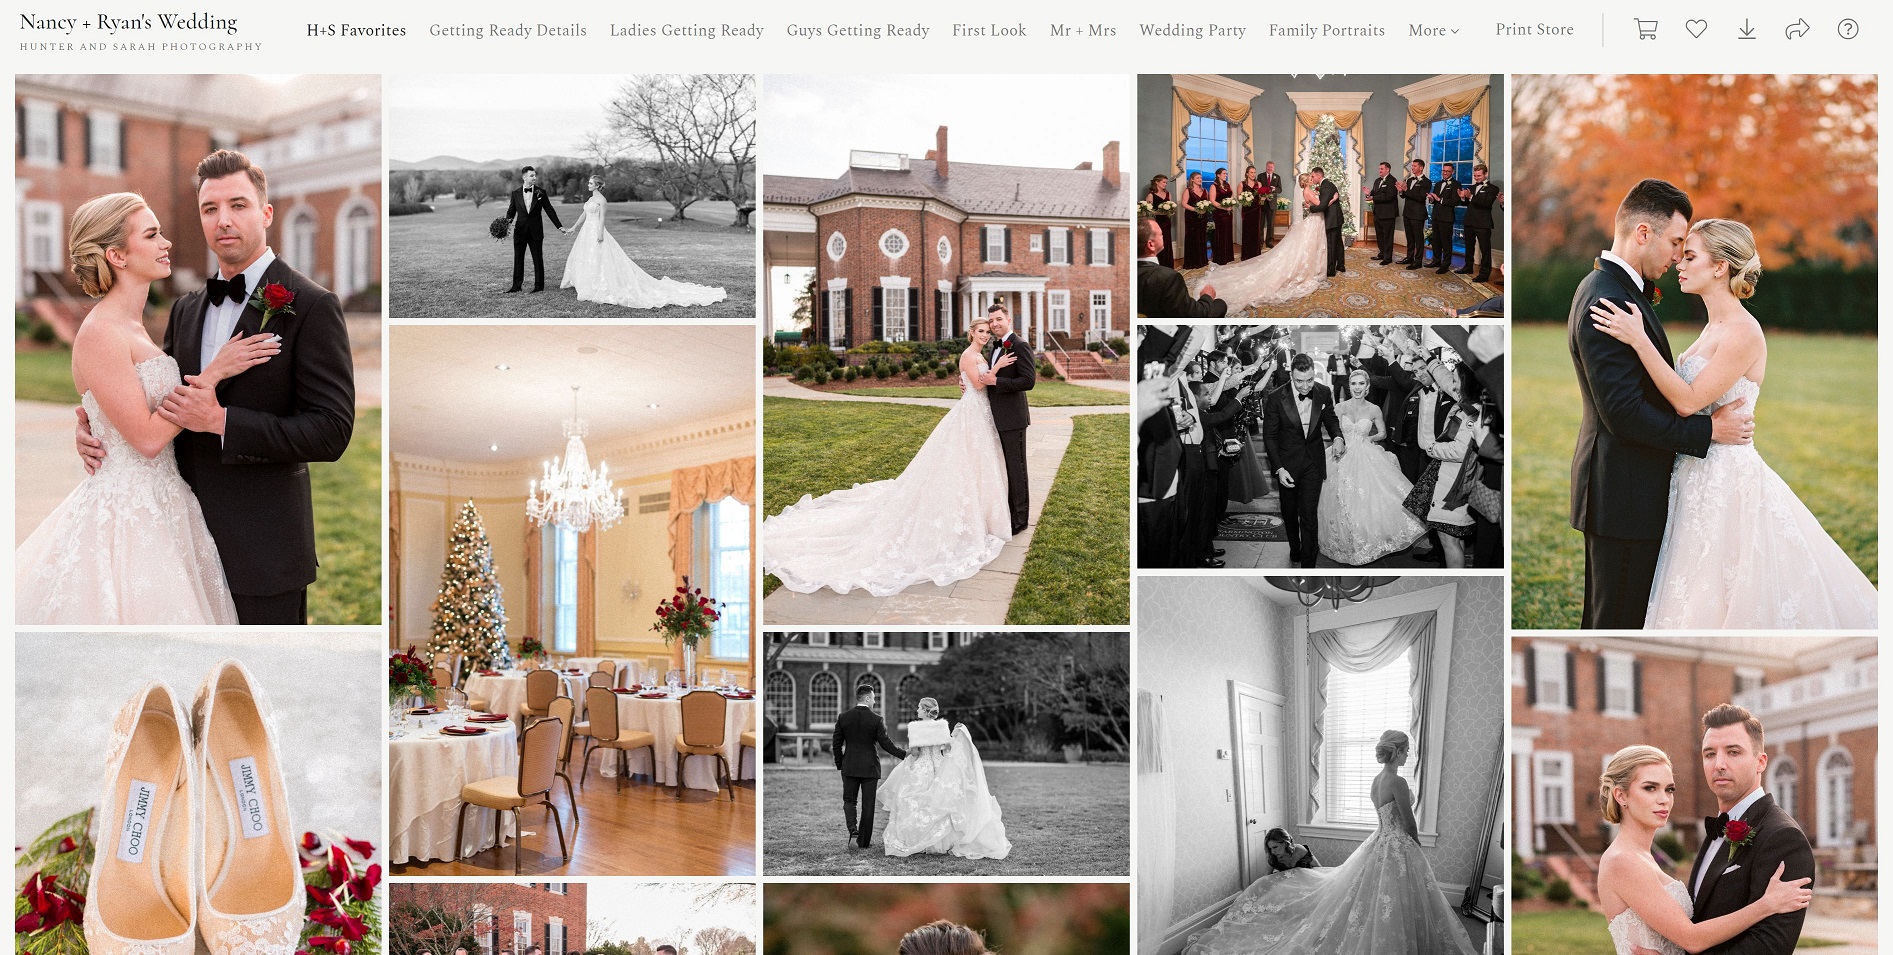
Always put your best foot forward with a “favorites” section!
“When Should I Deliver Wedding Photos to My Clients?”
This is a question we get often, and when you deliver the gallery can be just as important as how you deliver it. While it’s obviously possible to take too long to turn around photos, and make your clients mad, just like with the blog/sneak peek, we also believe that it’s also possible to deliver too early. One of our apprentices once told us that she was so excited after she shot her first solo wedding, she knew she wouldn’t sleep that night. So she stayed up all night and culled and edited the entire wedding! She delivered it at 6:00 am the next morning, before her couple even woke up to leave for their honeymoon.
We praised her willingness to hustle, but told her that this wasn’t a very good long-term strategy. For starters, sleep and self-care are important! But we also told her that she could have maximized her clients’ experience if she had given them a little time to come down from the wedding high, then delivered the full gallery a week or two (or more) later.
If she had given them a little taste (like with a sneak peek/blog) after a few days, it would have built anticipation. Then, the final gallery 3 weeks later would have felt like the grand finale! Can you image if you paid $250 per person to go to a super-fancy, Michelin-star restaurant to eat a 10-course meal, and they brought out the main entrée as the very first dish? Can you imagine if the biggest and best part of a fireworks show happened right at the beginning? Or what if you showed up at the movie theatres to watch the newest super hero movie, and the big climactic fight-scene took place in the first 15 minutes?!
Final Backup System
Believe it or not, there’s still one more step in our workflow once a wedding is delivered to our clients. We want to make sure that our internal systems are organized and efficient too, not just the ones that our clients see! So for starters, we right-click on the wedding folder in Lightroom, and mark it green to remind us that it’s finished. This helps us, at a quick glance, know how far along we are in a project at any given time. Red is backed up, yellow is culled, blue is blogged, and green is edited and delivered!
Once a wedding is delivered, we also clean up some of our backup systems to make room for future jobs. If you remember way back to Part 1, we said we’re a bit obsessive about backups. Before a wedding is delivered to the couple, it will exist in 4-5 places! However, that’s overkill for jobs once they’ve been completed, and the clients have their own copy of all of the images.
Once a job is delivered, we move it to our external hard drive, which is slower, but has more storage. This is where our completed jobs will live forever! We also remove the images from our memory cards to make room for more jobs. We’ll keep images in our online backup for as long as possible — so basically until we run out of storage on Dropbox. This means that a wedding may live in Dropbox for 6-12 months after the wedding, then just in our external hard drives after that.
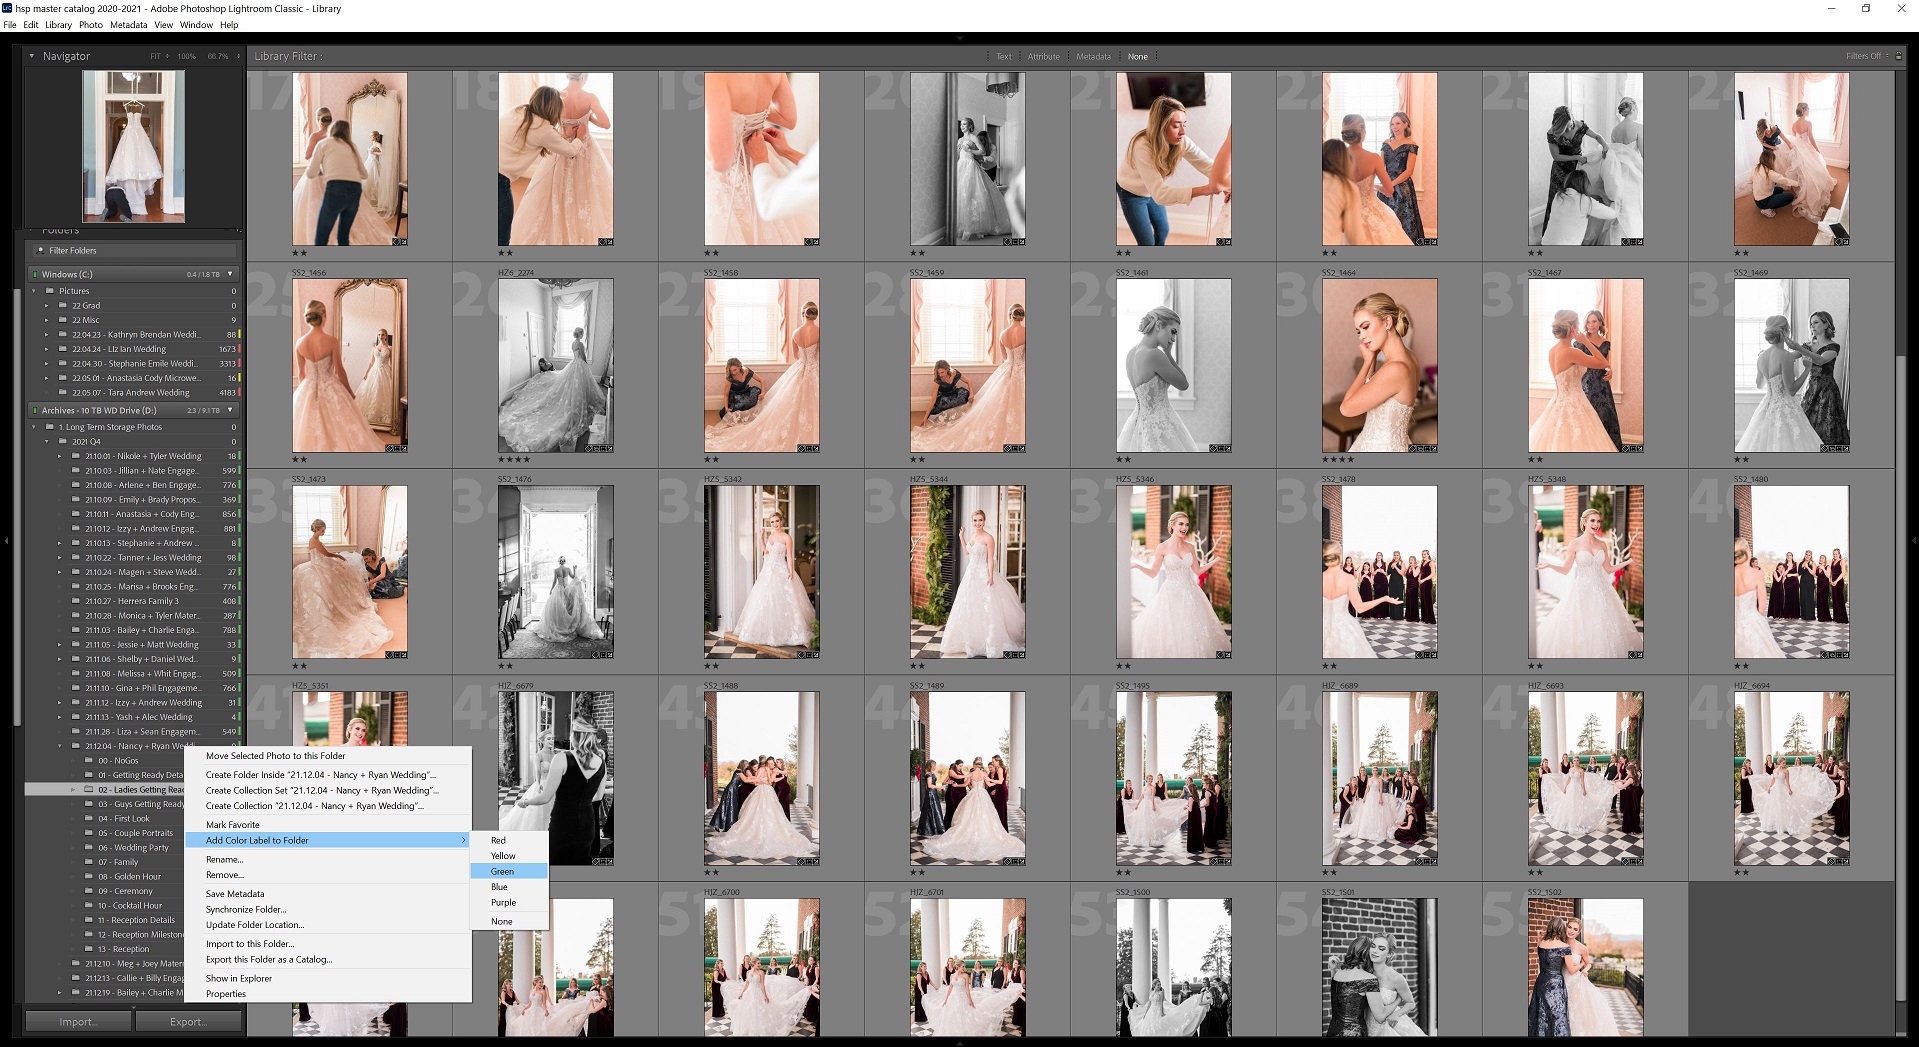
This is an example of our how Lightroom Primary Catalog may look at any given time. Most jobs are green and stored on an external hard drive (D:), since they’ve been completed. Meanwhile, all of the current jobs, marked red for “backed up but not yet culled” or yellow for “culled but not yet blogged” are stored on the computer’s internal hard drive (C:)!
Celebrate! 🎉
Okay, we lied. THIS is actually the last step: celebrate! Editing a wedding is a huge project, and for many photographers, one that only happens once or twice a month (or a year). So make sure that you take a moment to celebrate in whatever way makes sense for you. Maybe you go out to dinner with friends or your partner to celebrate a completed job, or maybe you allow yourself some time off to rest. Maybe you set aside $50 or $100 of every job specifically to buy something special for yourself as a reward for all your hard work!
No matter how you choose to celebrate, we hope that this blog series has helped you think about your own post production workflows, and that this knowledge helps you spend less time on your computer, and more time shooting, and spending time with your loved ones!
Want More?
Click HERE to get your free copy of our eBook: “5 Essential Tips for Turning your Side-Hustle into a Full-Time Photography Business.” You’ll also be subscribed to our newsletter, so our newest content, weekly encouragement, and exclusive offers will be delivered right to your inbox!

—
Check out the other segments in this blog series!
-
- Post Production Secrets Step 1: Best Backup System for Wedding and Portrait Photographers
- Post Production Secrets Step 2: How Keyword Sorting in Lightroom Will Change Your Life
- Post Production Secrets Part 3: Have You Been Culling/Selecting Wedding Images WRONG this Whole Time?!
- Post Production Secrets Step 4: Maximize Your Client Experience with Sneak Peeks And Blogging
- Post Production Secrets Step 5: How We Quickly Edit 1,000s of Wedding Photos in Adobe Lightroom
- Post Production Secrets Step 6: Best Photo Delivery Service for Wedding Photographers
Filed in:
Wedding Photography & Photography Education
Charlottesville, Virginia and Beyond
HOME
ABOUT US
WEDDINGS
JOURNAL
FOR PHOTOGRAPHERS
PRESS & PRAISE
BLOG
CONTACT
e. hunter@hunterandsarahphotography.com
p. (434) 260-0902
