VIEW BY CATEGORY:
Hi, we're Hunter and Sarah, a husband-and-wife, luxury wedding photography team. We’re also educators, helping other photographers build profitable and sustainable photography businesses.
MEET US
LOOKING FOR SOMETHING?
Intro to Aperture and Depth of Field (Shooting in Manual Part 1)
December 15, 2022
—
In today’s blog, we’re teaching all about aperture, one of the three fundamental controls you have over your camera, and how your aperture affects the images you take in a really fundamental way. After all, “How does aperture work?” is an essential question for any new photographer! If you want to understand how to use your DSLR or mirrorless camera, and take better images, then learning to shoot in manual is a great place to start!
Why Manual Mode?
If you’ve owned a DSLR or mirrorless camera for a little while now, you may have noticed that shooting with your camera in fully-automatic mode is a lot like taking pictures with an iPhone. You just point it at whatever you want to take a picture of, your camera does all the work, and you snap the picture.
When you’re first starting out and don’t know much about photography, this is obviously the best place to start! At the beginning, your camera is smarter than you when it comes to determining how much light should reach the sensor and make up an image. This is called “setting the exposure” or “exposing” an image, and your camera is going to do a pretty decent job of this in auto.
But over time, if you want to take better images — and especially if you want to become a professional photographer one day — you’ll need to learn how to take the reigns away from your camera, and start to control some or all of your exposure settings on your own. That’s where shooting in manual mode comes in, and that’s what these next few videos are going to be all about.
What We DON’T Mean…
Now, before we jump in too far to talking about this, we want to clear up a common misunderstanding that we see all the time around the word “manual”. When we talk about shooting in manual, we’re talking about manually setting the exposure for an image. We do this by setting our aperture, ISO, and shutter speed until our image looks the way we want it to.
What we’re not talking about is manual focus, which is an entirely different subject. Manual focus is where you turn off your camera’s autofocus, and use your hand to dial in the lens’ focus on your subject. But as two full-time professional wedding photographers, we have almost never used manual focus before, because more often than not, what looks good to your eye through a tiny viewfinder or LCD screen ends up being slightly out-of-focus once you see the image blown up full-size on your computer. So we just always leave our auto-focus on.
What this and the next few videos are about is manually setting your exposure, and today we’re starting with aperture.
What is Aperture?
Let’s start with what aperture is in the first place. Inside every lens is something called a diaphragm, and your aperture is a measure of how open or how closed your diaphragm is. If you look closely through your lens, you can see the diaphragm open when you first turn on this camera. Ultimately, aperture is just how open or how closed your lens’ diaphragm is.
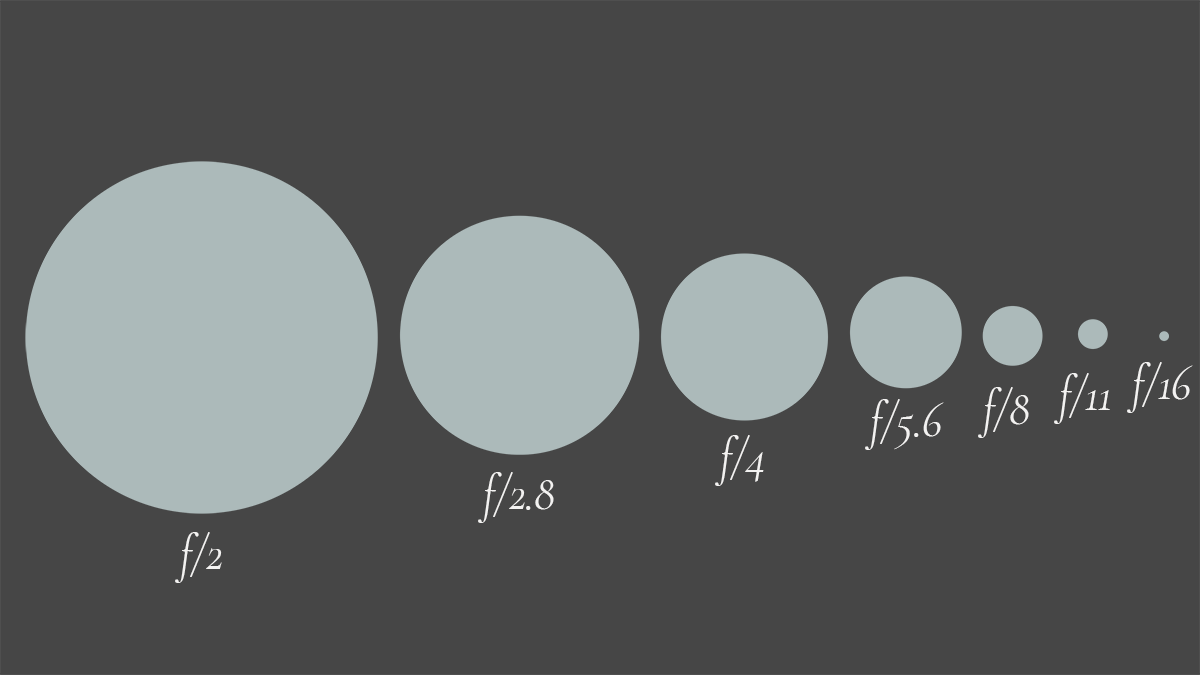
Aperture is measured using what’s called “f-stop numbers”, and you’ll often see them written out as “f/” then a number — usually a decimal. So “f/1.8″ or “f/5.6″, for example.
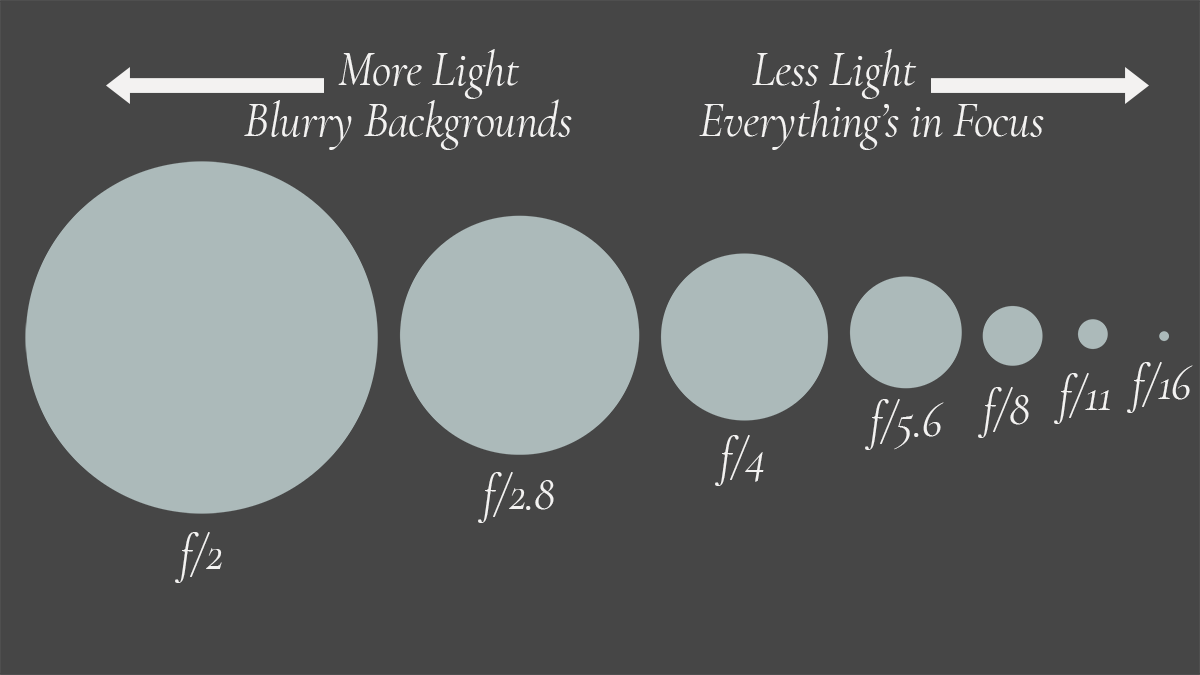
Below are a handful of common apertures, and a visual example of what the opening in your lens might look like. You don’t need to memorize these numbers, but you do need to understand that a lower number means a more open aperture, and a higher number means a more closed-down aperture.
Why is Aperture Important?
So, all of this is great, but why is aperture actually important? Well, just like shutter speed and ISO, your aperture is important for two reasons, and the first is light. Opening up or closing down your aperture is going to affect the overall amount of light that hits the sensor inside your camera. As you open up your aperture and the hole inside your lens gets bigger, more light is going to reach your camera’s sensor, which makes your image brighter.
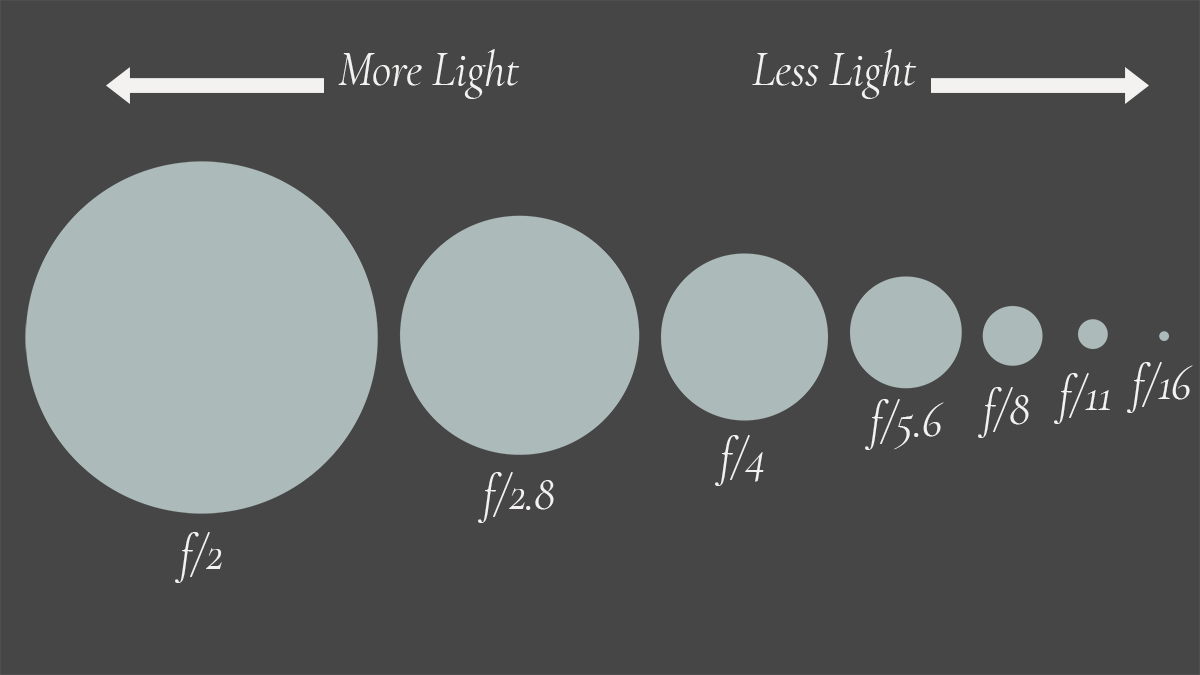
On the flip side, as you close your camera’s aperture down and the hole gets smaller, less light is getting through, making your image darker. If you’re having trouble keeping track, below is that same diagram we just showed you, but this time, it includes how aperture affects your light. Wider apertures like f/2 or f/2.8 are going to lead to more light in your images than a more narrow aperture like f/11 or f/16.
Let’s use an analogy that might help: think of ambient light (the amount of light that’s all round us) like rain that’s falling from the sky, and the image sensor inside your camera is like a bunch of buckets that are waiting to be filled with water. Your lens is like the hose that brings that water towards those buckets. In this example, your aperture is like a funnel at the opening of that hose. How big that funnel is, is going to determine how much water enters the hose and eventually reaches those buckets.

If you use a hose with a really wide funnel, lots of water is going to rush through to those buckets.

On the other hand, if you use a really narrow funnel, not much water is going to reach those buckets.

Light works the same way, with wider apertures letting in lots of light, and more narrow apertures letting in less light. Below is an example with actual imagery so you can get an intuitive sense of what we’re talking about. Below, the image on the left was taken at f/1.8, and the image on the right was taken at f/5.6, with all the other settings the same. Hopefully it’s pretty obvious that the image on the left is much brighter than the image on the right!
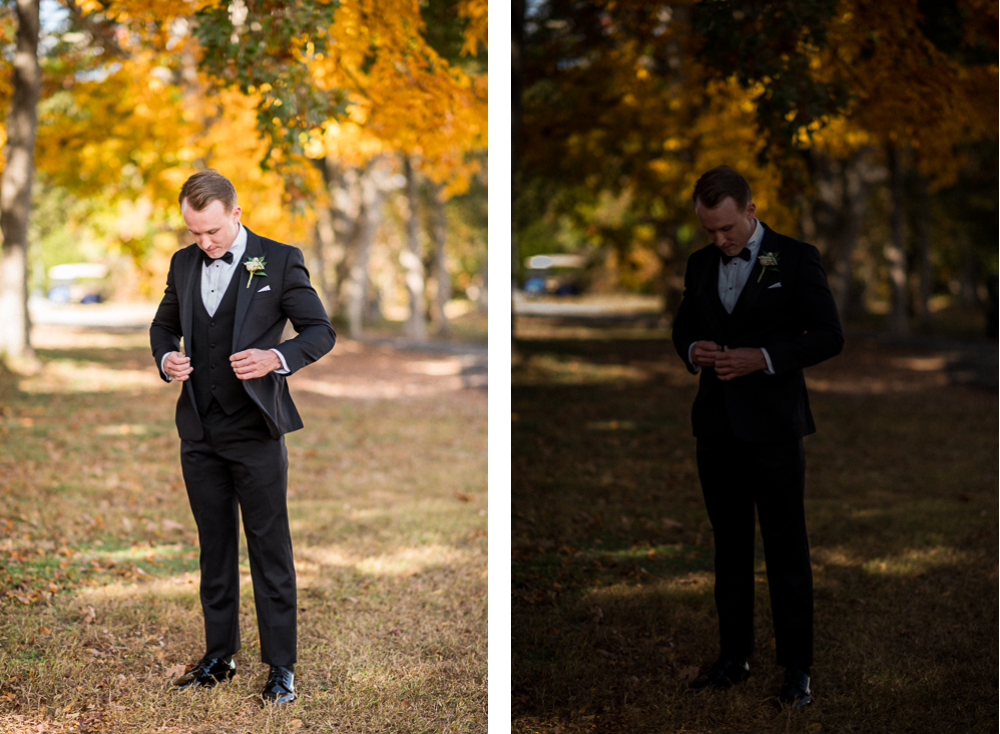
LEFT: f/1.8, 1/500, ISO 50 RIGHT: f/5.6, 1/500, ISO 50
How Else Does Aperture Affect Your Images?
How aperture affects the overall brightness of your image is the easiest to understand. But just like shutter speed and ISO (which we’ll be discussing in future videos), aperture also has a second effect on your images that’s totally unique.
For aperture, the second way that it affects your imagery is depth of field. Depth of field is a fancy way of talking about how much of an image is in-focus. If your subjects really POP from the background, which is soft and blurry and faded, then you have what’s called a “shallow” depth of field. Most of the imagery that we take as wedding and portrait photographers will have a shallow-depth of field.
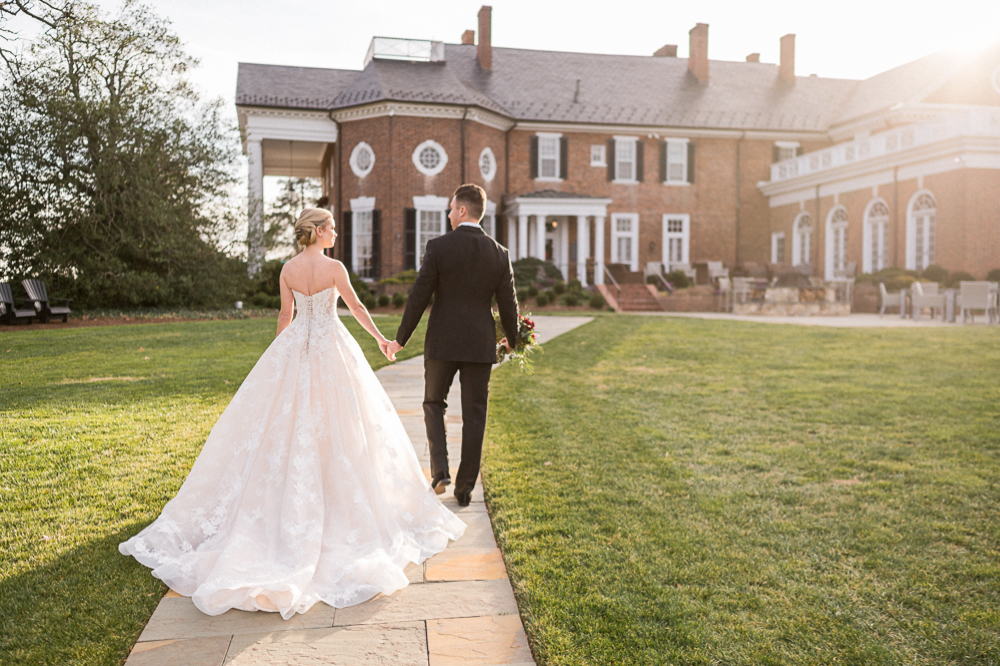
On the other hand, if your subjects and the background are all in focus, then you have a deeper depth of field. This is often good for landscape photography or for taking photos of big groups of people with multiple rows. But as wedding photographers, it’s pretty rare for us to take pictures with a deep depth of field. Hopefully the example below is helpful — do you notice how much more in-focus and distracting the background is on the image with a higher f-stop number? To us, the image on the left with the wider aperture really makes our subject pop.
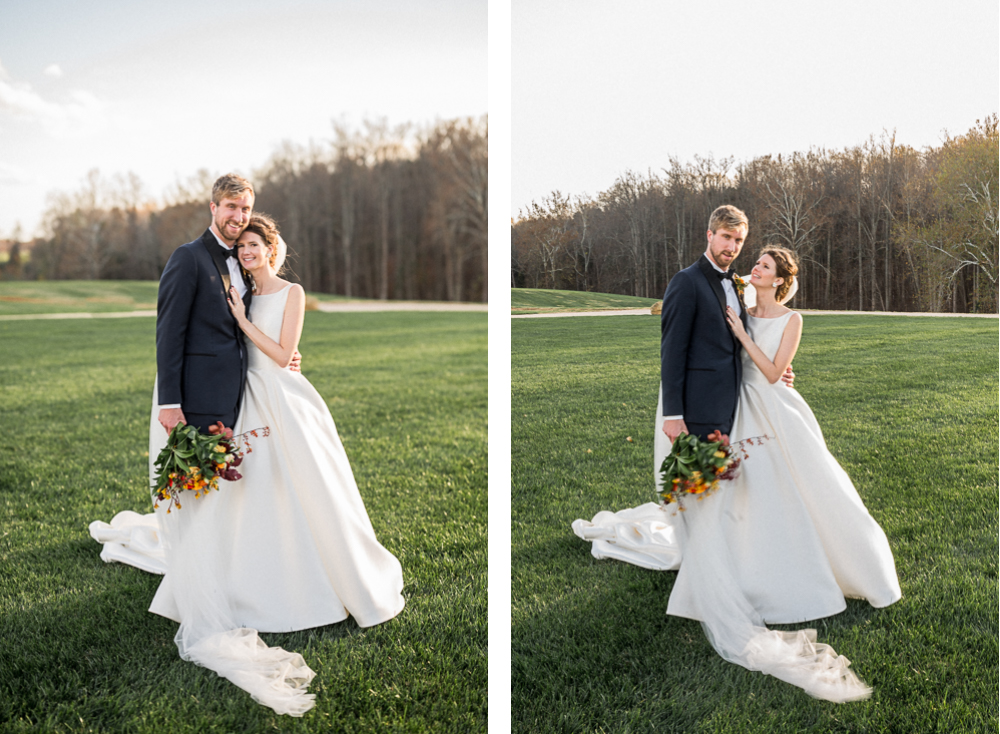
LEFT: f/1.8, 1/640, ISO 50 RIGHT: f/16, 1/80, ISO 800
Now, there are a handful of other factors that will affect your depth of field. For example, a shallow depth of field is easier to achieve on longer, more telephoto lenses than on wider lenses. And even your distance from your subject and background can have a big effect. But the biggest factor is aperture. Low f-stop numbers — the same f-stop numbers that bring in lots of light — also lead to a more shallow depth of field and those soft, blurry backgrounds.
And high f-stop numbers — the ones that let in less light — also lead to a deeper depth of field, where everything is more in focus. So here’s that chart one more time, with all the information you need about aperture.
If this all felt a little theoretical to you, that’s okay! You need to understand the “what behind the how” if you’re ever going to really understand the way your camera works. But next week, we’re going to dive into Aperture Part 2, where we’re going to give a few more real world examples, and share how we set our own aperture on portrait sessions and on wedding days!
Want More?
Click HERE to get your free copy of our eBook: “5 Essential Tips for Turning your Side-Hustle into a Full-Time Photography Business.” You’ll also be subscribed to our newsletter, so our newest content, weekly encouragement, and exclusive offers will be delivered right to your inbox!
—
Check out the other segments in this blog series!
- Part 1: Intro to Aperture and Depth of Field
- Part 2: Best Aperture for Portrait and Wedding Photography
- Part 3: Intro to Shutter Speed and Motion Blur
- Part 4: Best Shutter Speed for Portrait and Wedding Photography
- Part 5: Intro to ISO and Grain/Noise
- Part 6: Best ISO for Portrait and Wedding Photography (Indoor & Outdoor)
- Part 7: No More Confusing “Exposure Triangle”! The EASY Way to Set Your ISO, Aperture and Shutter Speed
Filed in:
Wedding Photography & Photography Education
Charlottesville, Virginia and Beyond
HOME
ABOUT US
WEDDINGS
JOURNAL
FOR PHOTOGRAPHERS
PRESS & PRAISE
BLOG
CONTACT
e. hunter@hunterandsarahphotography.com
p. (434) 260-0902
